Setup comparison
The single most important thing to keep in mind when using mail handlers is that there cannot be more than two mail handlers downloading emails from the same mail account, unless they are filtering for different email aliases.
This can cause problems as the handlers could ‘steal’ emails from each other, therefore it is essential to avoid.
Classic Mail Handler
Classic Email This Issue Mail Handlers are composed of three components. The three basic steps to configure a mail handler are:
Add an IMAP/POP server in Jira's Incoming Mail Page to get access to your inbox and download the emails and pass it to the handlers
Add an “Email This Issue” type Mail Handler in Jira's Incoming Mail Page to hook into the Jira API that passes the downloaded email messages to the Email This Issue-side handler
Add a Classic Mail Handler Context in Email This Issue administration to fully configure the rich functionality that comes with the addon
These Jira mail handler connections cannot be used with our NG Mail Handlers, only with our app's Classic Mail Handlers.
Next-Generation Mail handler
Contrary to the classic Email This Issue Mail Handler, the Next-Generation Mail handler is composed of two components.
In this case, however, the handler is independent of Jira, therefore the two basic steps to configure a mail handler are different:
Add a Mail Account in Email This Issue administration to download the email messages and pass it to the handler
Add a Next-Generation Mail Handler Context in Email This Issue administration to fully configure the rich functionality that comes with the addon
These mail account connections cannot be used with Jira's built-in Incoming Mail Handlers, only with our app's Next-Generation Mail Handlers.
Configuration Comparison
In this section, we are going to compare configuration items between the Classic and the Next-Generation Mail handler. It is important to note the main differences between the two:
The Classic mail handler displays all configurations on a single page, making it harder to learn, harder to see through and understand.
The Next-Generation Mail handler is easier to learn and understand due to its 4-piece structure. With the use of conditions, complex project routings and conditional processing options are available.
Note that in this documentation we will not discuss edge cases, but draw a comparison between basic scenarios and map functionalities with similar behavior.
In every section below, the information will be based on classic mail handler functionalities after which an explanation of the corresponding Next-Generation Mail handler action will be given.
| Expand |
|---|
|
Classic handler setup | Details | Example image |
|---|
In the case of the Classic mail handler, every handler is uniquely matched to a scope. | Project: to which the context applies. If left empty, context applies to all projects.
Issue Type: to which the context applies. If left empty, context applies to all issue types. | 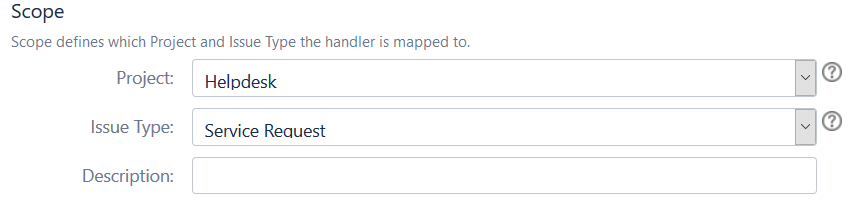 Image Modified Image Modified |
Next-Generation Mail handler setup | Details | Example image |
|---|
While the classic handler has a set scope, the Next-Generation Mail handler does not have a singular, uniquely configured scope. Routing emails to Projects and Issue Types can be done through separate actions, using conditions and creating new issues in the Create Issue action. With these conditions and actions more than one project can be individually configured using only one handler. | Project: to which the mail handler applies in case a new issue has to be created. The issue will be created in the project that is selected here. Issue Type: to which the mail handler applies in case a new issue has to be created. The issue will be created in the project that is selected above with the Issue Type that is selected here. Request Type: only available for Service Desk Management projects, not displayed for non-JSD projects. | 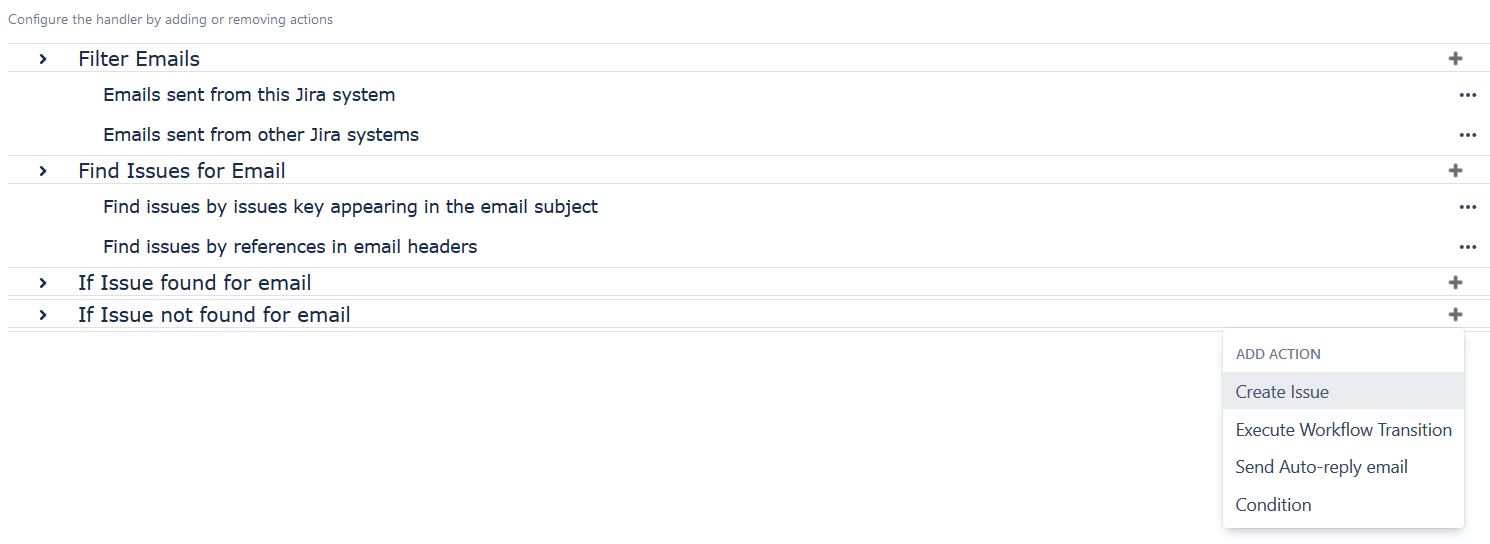 Image Modified Image Modified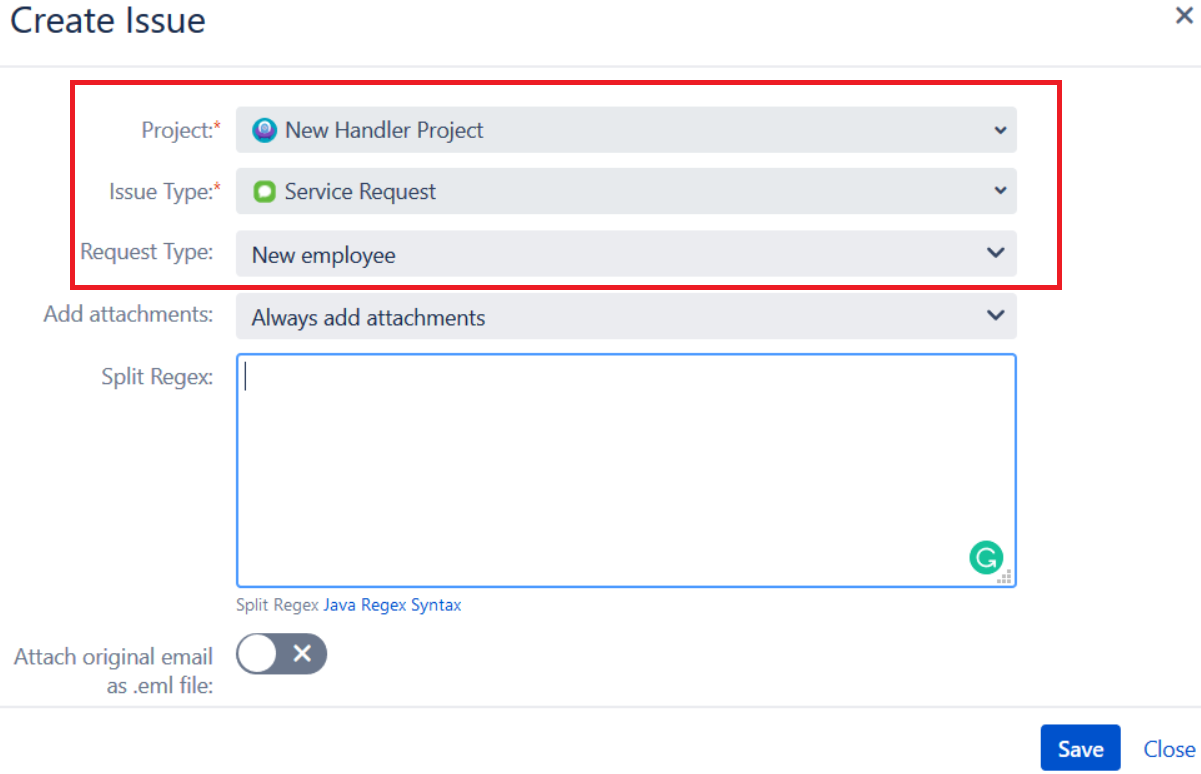 |
|
| Expand |
|---|
|
Classic handler setup | Details | Example image |
|---|
The Email Processing Strategy in the Classic mail handler determines how Email This Issue Mail Handler processes incoming emails.
| There are various strategies available out-of-the-box: Create Or Comment Issues: either create a new issue or comment on it. It supports Split Regex (see below) Create Or Comment Or Link Issues: either create a new issue or comment it if the issue matches the given JQL criteria, otherwise Create a new issue and link it. It supports Split Regex (see below). Always Add Comments: find a related issue for each email and if found, comment it. It supports Split Regex (see below).. Always Create Issues: create new issues for all incoming emails. Service Desk Management Create or Comment Create Issues or Email Log: No comments will be added.
| 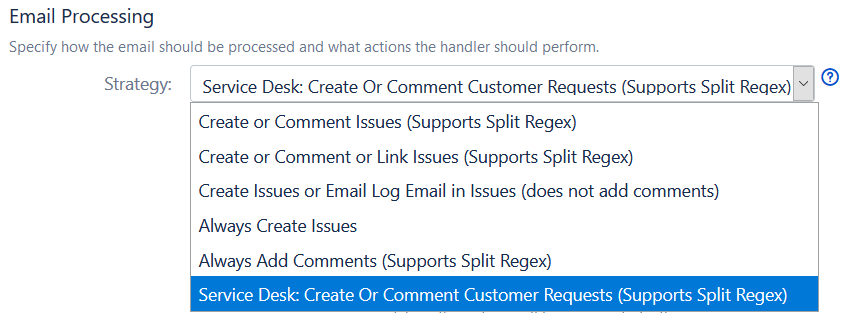 Image Modified Image Modified
|
Next-Generation Mail handler setup | Details | Example image |
|---|
In the Next-Generation Mail handler, the email processing is separated to actions within two possible sections: In case the issue is found for the email, you can choose to select the Add Comment OR the Create issue actions to your handler. In case the issue is not found for the email, you can add the Create issue action to your handler. | Add Comment Action If you want to add a comment when an issue is found based on an incoming email, use the Add Comment action. Set the Comment Visibility as you require and select how we should add attachments from incoming emails. If you do not set up anything in the “If issue found for email” section, a new issue will always be created based on the incoming email.
This is identical to the Always Create Issues strategy in the classic mail handler. If you set up the Add Comment action in the “If issue found for email” section AND add the Create issue action in the “If issue not found for email“ section, your setup will be identical to the Create Or Comment Issues strategy in the classic mail handler (in case of non-JSD projects).
If you set up the Add Comment action in the “If issue found for email” section AND add the Create issue action in the “If issue not found for email“ section with the scope of a Service Desk Management project, your setup will be identical to the Service Desk Management Create or Comment strategy in the classic mail handler.
| 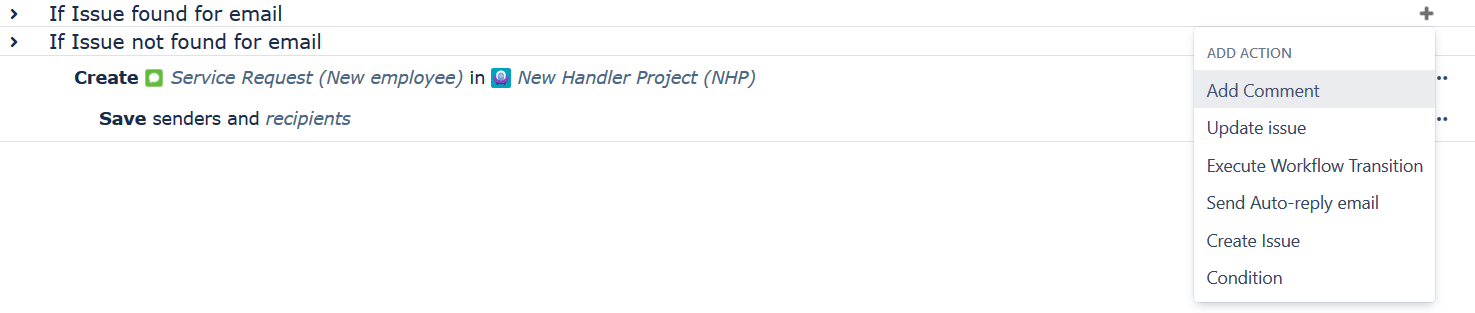 Image Modified Image Modified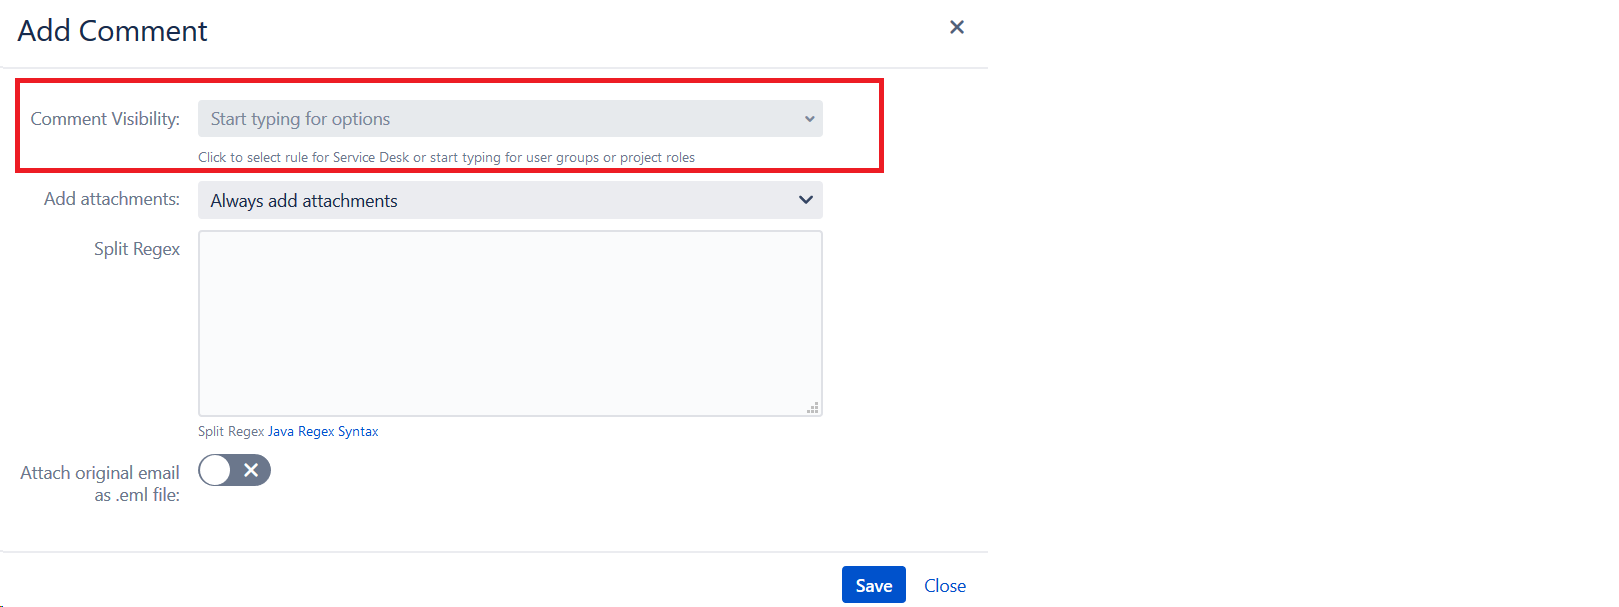 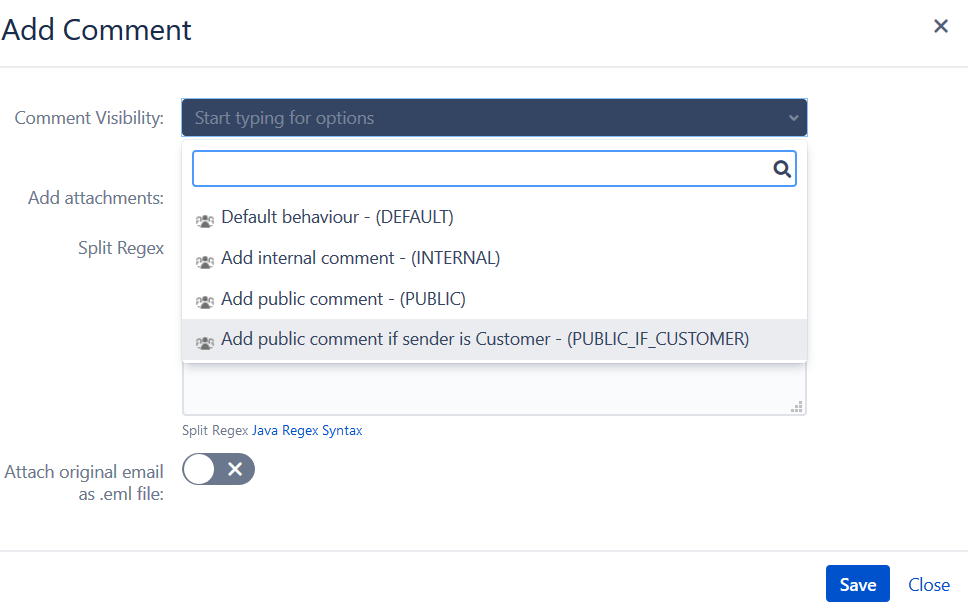 Image Modified Image Modified | | Create Issue Action If you want to create an issue based on an incoming email, use the Create Issue action. This action is available in both the “If Issue found for email” and the “If Issue not found for email” sections. Set the scope of the action to the project/issue type and request type of your choosing as discussed in the Scope section. Link type: two issues may be linked using the link type attribute, but this is optional. If the incoming email references an existing issue (for example in the subject), the new issue will be linked by the type you select here. Add attachments: Defines how the action handles attachments in the email. Options include: Add Attachments Do not Add Attachments Do not add attachment if one with the same name exists Do not add attachment if one with the same name and size exists Filter attachments using the Attachment Filters
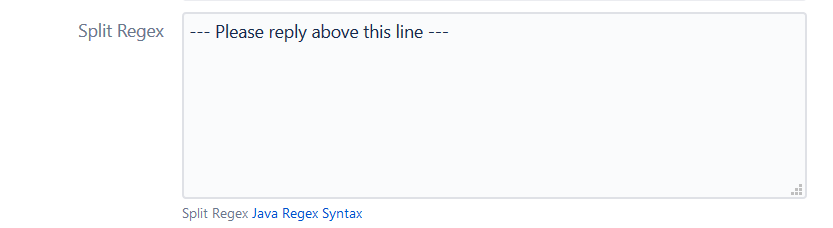
Split regex: This field may contain Java regular expressions that will be matched against the comment body. If either of the regexes matches the body, the body is split at the match position. The part of the body before the match position will be added as the comment, while the rest is dropped.
Attach original email as .eml file: If enabled, the original email is attached to the issue as an email file (.eml format). | Image Modified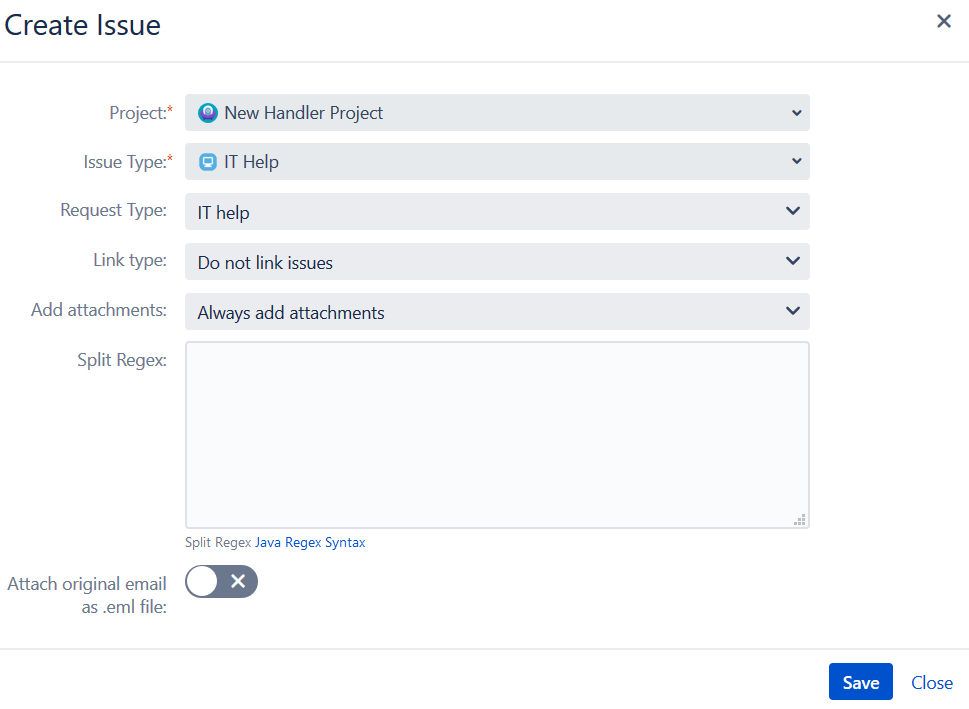 |
|
| Expand |
|---|
|
Classic handler setup | Details | Example image |
|---|
In the Classic mail handler, “Handler actions” are available for all strategies and they work side by side with our field rules. | Executes workflow transition on issues: if enabled, the mail handler executes a workflow transition on the issue (read on for more information). Initializes Issue Fields: if enabled, the mail handler looks up a Field Context and applies its field rules to initialize issue fields. Overrides Default Issue Lookup: if enabled, the mail handler looks up a Field Context and applies its issue lookup field rules to find the issue that can be associated with the incoming email. Filter incoming emails: If enabled, the mail handler looks up a Field Context and applies its filtering rules to the email.
| 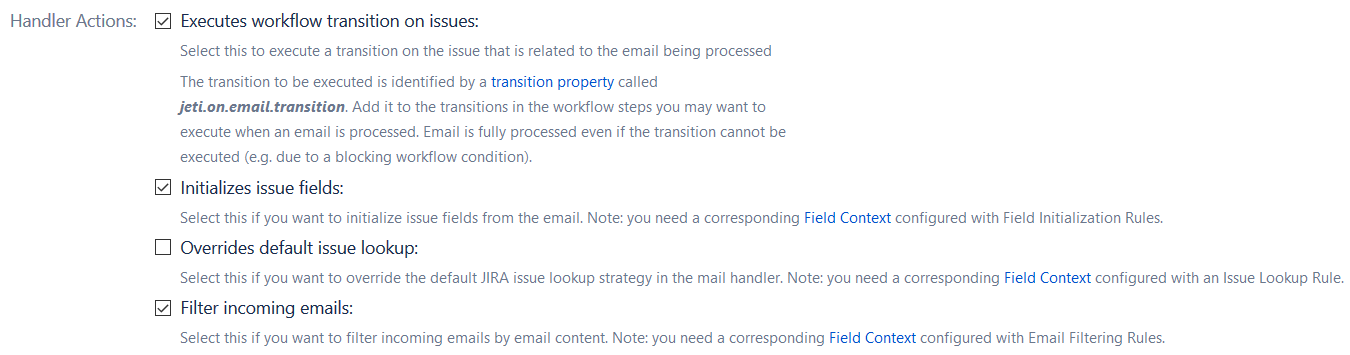 Image Modified Image Modified
|
Next-Generation Mail handler setup | Details | Example image |
|---|
In the Next-Generation Mail handler, “Handler actions” no longer work using field rules, but they all have their own actions. It means that even if you have field rules set up, they will not work with the Next-Generation handler, they will be ignored. | The Executes workflow transition on issues handler action in the Next-Generation Mail handler can be achieved by using the Execute Workflow Transition action.
This action executes a workflow transition on the issue. The transition to execute is either determined by a transition property or by email content. | 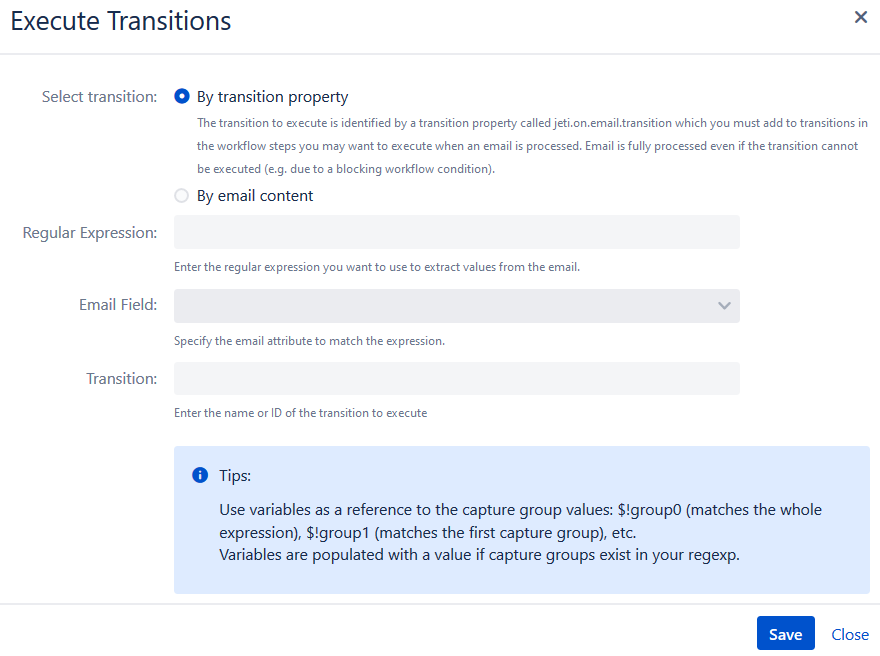 Image Modified Image Modified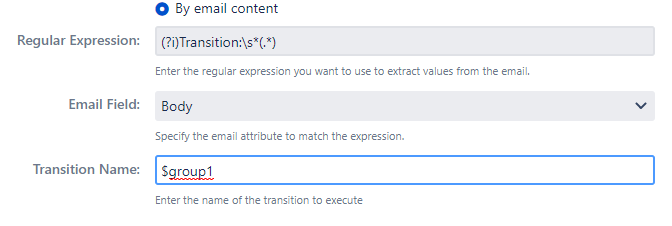 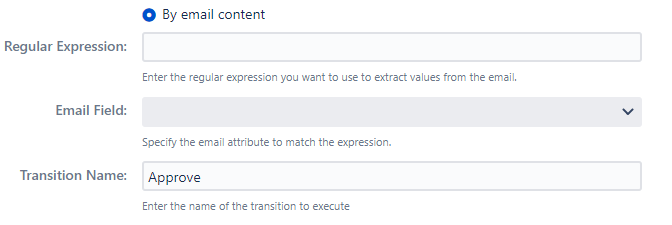
|
| The Initializes Issue Fields handler action in the Next-Generation Mail handler can be achieved by using the Set Field action. | 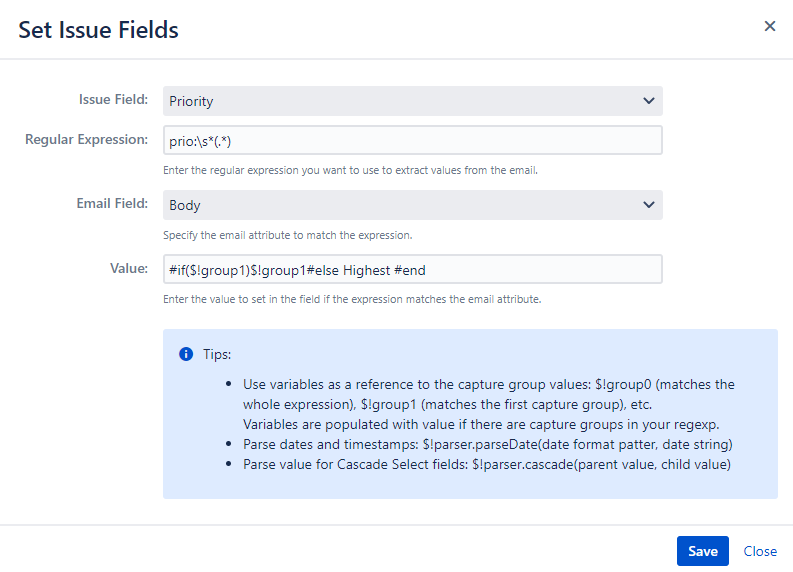
| | The Overrides Default Issue Lookup handler action in the Next-Generation Mail handler is no longer available on its own.
The result of an issue lookup rule can be achieved in the Find Issues for Email section. In this case, the Find issues by references in email headers (this is the one that is equivalent to the Ignore Issue ID in Email Headers) should be used. |  |
| The Filter incoming emails handler action in the Next-Generation Mail handler can be set in the Filter Emails section. Email filter actions check different characteristics of the incoming emails. If an email passes a filter, the next filter is checked. If an email does not pass a filter, then the process stops and the email is marked as filtered out and will not be processed. There may be multiple filter actions added to a handler. To add a filter action, use the + icon. | 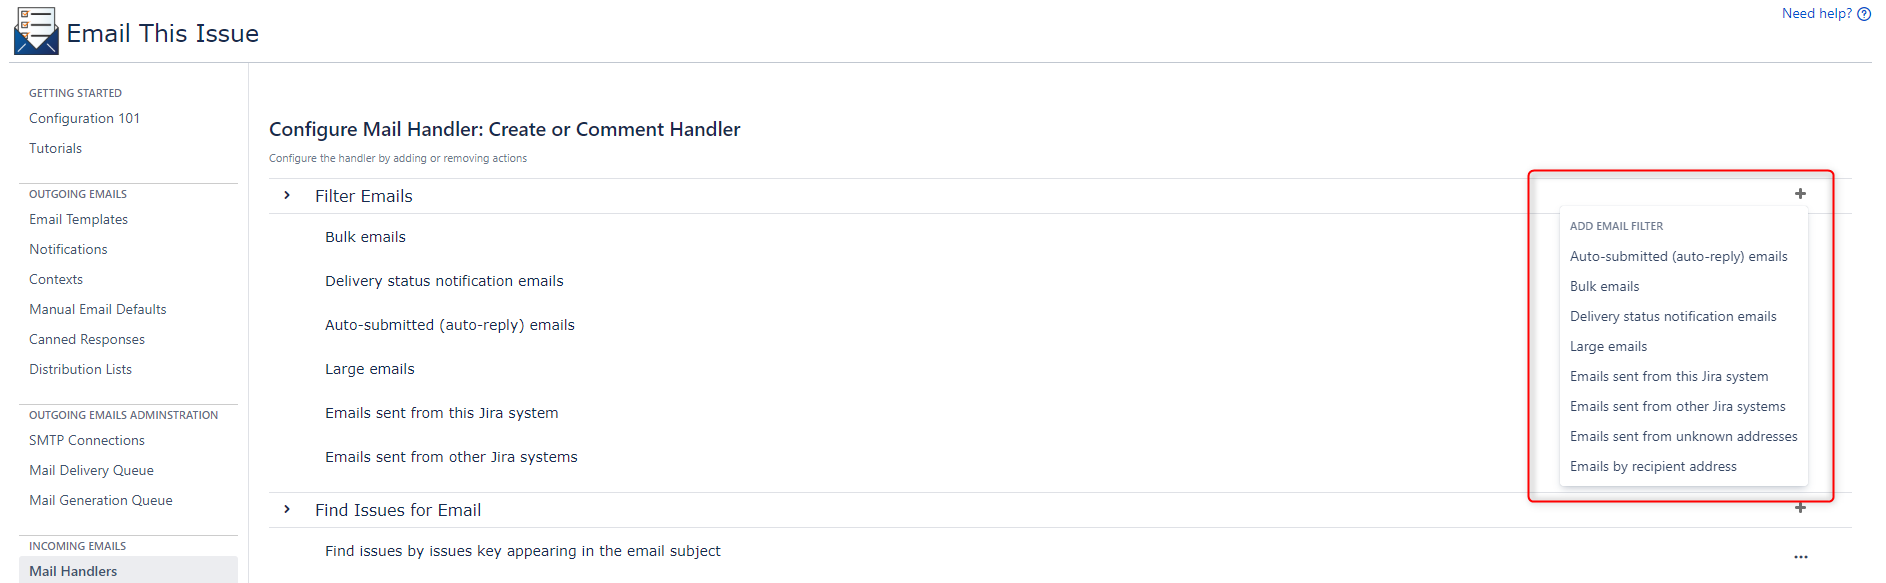
|
|
| Expand |
|---|
| title | Acknowledge Incoming Emails |
|---|
|
Classic handler setup | Details | Example image |
|---|
In the classic mail handler, the Acknowledge Incoming Emails section offers three different methods for acknowledging incoming emails. | Event: Email This Issue Mail Handler can fire an event for each incoming email that the mail handler processes. Acknowledge New Issues: If an email template is selected here, it will be used to generate auto-acknowledge emails when a new issue is created from an email. Acknowledge New Comments: If an email template is selected here, it will be used to generate auto-acknowledge emails when a new comment is added to an issue from an email. | 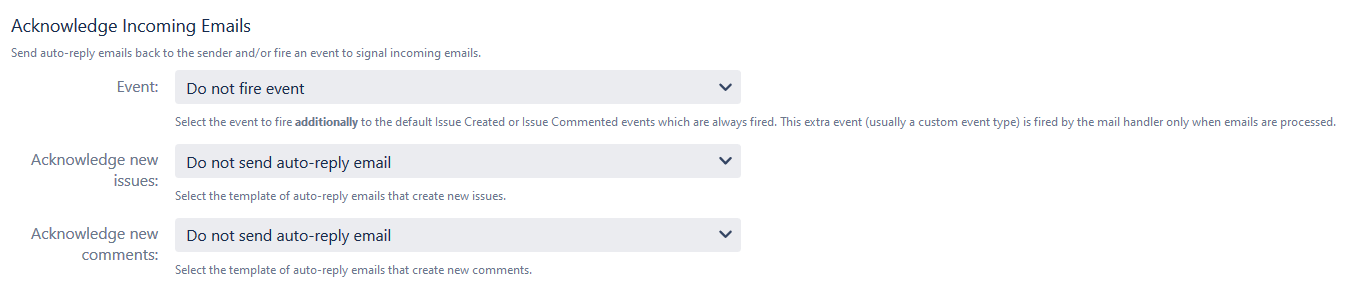 |
Next-Generation Mail handler setup | Details | Example image |
|---|
In the Next-Generation handler, the “Acknowledge Incoming Emails” section is no longer available as a separate function, but you can still send auto-reply emails when an issue is found or not. Please note that the Event function has been removed, it is not possible to fire extra events using the handler after processing. | The Send Auto-reply email in the Next-Generation handler has the same purpose as the Acknowledge New Issues and the Acknowledge New Comments options had in the classic handler. You should click on the If Issue found for email or the If Issue not found for email sections in the handler and select theSend Auto-reply email option. Please note that this action cannot be nested in conditions, therefore they will always be sent out. From Address and the Reply-to Address options are available in this section, however, please note that these are only applicable for these auto-reply emails. From Address and Reply-to Address options for other outgoing emails are still available from the Context. | 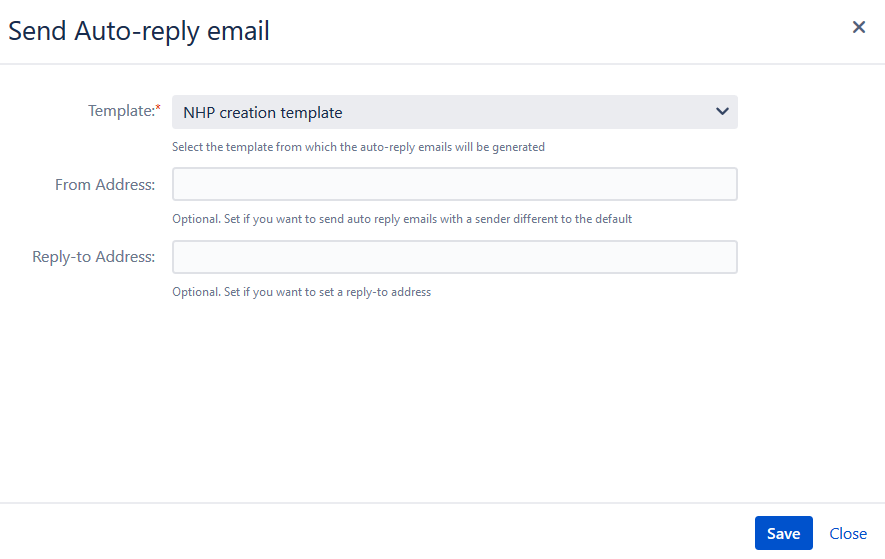 |
|
| Expand |
|---|
| title | Senders and Recipients |
|---|
|
Classic handler setup | Details | Example image |
|---|
In the classic handler setup, the senders and recipients section is responsible for the configuration of saving the senders and the recipients from an incoming email processed by Email This Issue. Please note that neither the classic handler nor the Next-Generation handler can save BCC recipients due to technical limitations. | Sender Email Address Field: The custom field selected here will be used to store the email address of the email's sender. Sender Name Field: The custom field selected here will be used to store the name of the email's sender. User Recipients: This attribute determines how the mail handler should treat users recognized as recipient email addresses: Add to watchers: save as watchers in the issue Save to multi-user picker field: save them in the selected user picker field Treat as email addresses: treat them as email addresses and save the email addresses in the recipient fields (see below).
Recipient field (To): The custom field selected here is used to store email addresses of the email's TO recipients. Recipient field (Cc): The custom field selected here is used to store email addresses of the email's CC recipients. |  |
Next-Generation Mail handler setup | Details | Example image |
|---|
In the Next-Generation setup, the senders and recipients section is fully available using the Manage Senders and Recipientsaction. The Manage Senders and Recipients action is available either through the Create action OR the Update Issue action in case of issues that are found. Please note that neither the classic handler nor the Next-Generation handler can save BCC recipients due to technical limitations. | In the Next-Generation handler the senders and the recipients may be saved in a more detailed way then it was possible with the classic mail handler.
For saving the senders:
select the issue field to which the sender will be saved if s/he does not have permission to create or access the issue in Jira. User picker or text fields are available for selection, please keep in mind that only users will be saved to user picker fields, while people unknown to Jira can only be saved in multi-line text fields.
Email addresses saved here may be set as recipients in notifications or manual emails.
Saving the sender's name is possible by using the Set field action. | 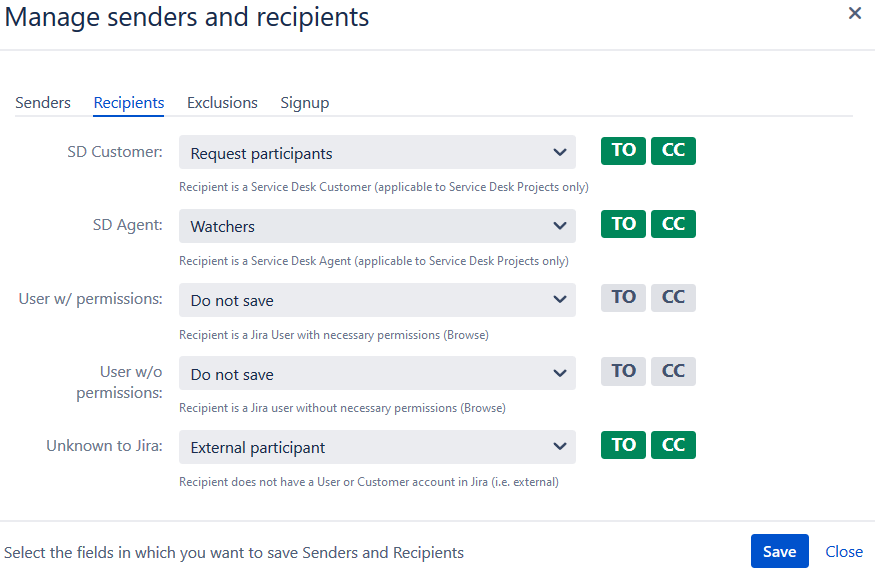 |
|
| Expand |
|---|
|
Classic handler setup | Details | Example image |
|---|
In the Classic handler, Advanced Settings are offered for a number of additional functions. They are not necessary for basic email processing but can make life easier and provide useful tools. | Email Address Exclusion: Email addresses (one per line) entered here are not saved in the sender or recipient fields (useful to save the mail handler address here to avoid mail loops). Supports regular expressions, to ensure your email address exclusion will not run into problems. Include (?i) at the beginning of the email address for safety. Split Regex: Regular expressions (one per line) entered here are used to split the email body by a delimiter (optionally the original incoming email as well). See more details below. External Email Senders: Specify how to treat emails sent from email addresses not registered as users in Jira. Options are to accept the mails for processing or to ignore (leave in the mailbox) these emails. If you want to prevent the situation that practically anyone could pollute your Jira instance by sending emails, simply set this option to Ignore. Jira Mail Strategy: Specifies how to treat emails sent from the current or another Jira instance. Options are available to accept or ignore these emails. Please be careful to avoid email loops when sending emails between Jira instances. Ignore Issue ID in Email Headers: By default, Email This Issue checks for the "In-Reply-To" and "References" email headers for Jira IDs if no issue keys appear in the email subject. If such an issue ID is found, it comments on the issue. By enabling this option you can override the default behavior and make Email This Issue ignore these email headers. It can be useful to prevent confusion when an email sent from Jira is replied or forwarded back to Jira. In such cases, the seemingly unrelated issues may be commented on. If this checkbox is turned on, Email This Issue will only use the email subject and its own Issue Lookup Field Rules to process emails but will ignore the invisible email headers. | 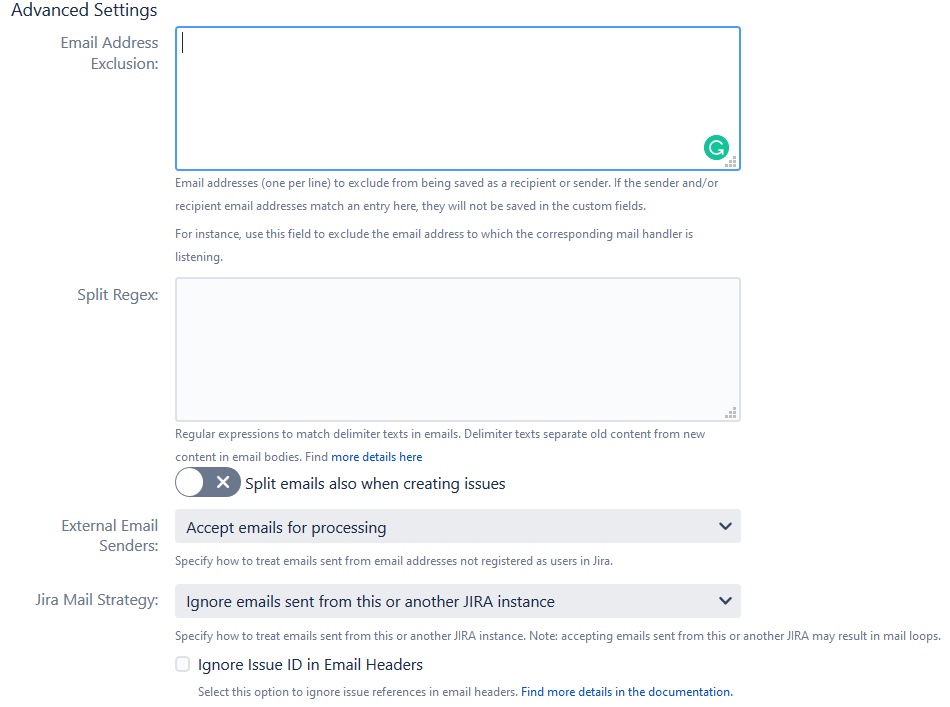 |
Next-Generation Mail handler setup | Details | Example image |
|---|
In the Next-Generation handler, the Advanced Settings are offered as parts of other, previously mentioned actions. | Email Address Exclusion is available in the Manage Senders and Recipients action - Exclusions tab. Here, you can exclude email addresses from being saved as senders or recipients. Email addresses (one per line) should be entered to exclude from being saved as a recipient or sender. If the sender and/or recipient email addresses match an entry here, they will not be saved in the custom fields. For instance, use this ffield to exclude the email address to which the corresponding mail handler is listening. Split Regex functions are available on the Create Issue and Add Comments sections. Accepting emails from External Email Senders can be restricted in the Filter emails section. The function called Jira Mail Strategy in the Classic handler, that specifies how to treat emails sent from the current or another Jira instance can be restricted in the Filter emails section. Ignore Issue ID in Email Headers is not available as a separate action in the Next-Generation handler. This can be set up in the Find Issues for Email section.
This part of the handler contains Issue Lookup Actions whose responsibility is to find issues associated with the email using different approaches. The approaches to find issues associated with emails are: Find issues by the issues key appearing in the email subject Find issues referenced by the In-Reply-To or References headers (this is the one that is equivalent to the Ignore Issue ID in Email Headers) Find issues by a JQL query composed of the email attributes
|   |
|
Notable Questions
Please read the below questions in order to get a better view of the differences and in order to be able to troubleshoot basic mail handler problems.
Question | Classic Email This Issue Mail Handler | Next-Generation Email This Issue Mail Handler |
|---|
Who has access to my mailbox? | Jira has access through its IMAP server settings in Jira administration-Incoming mail | Email This Issue has direct access to your mailbox via the Mail Account you set up in Email This Issue administration - Mail account |
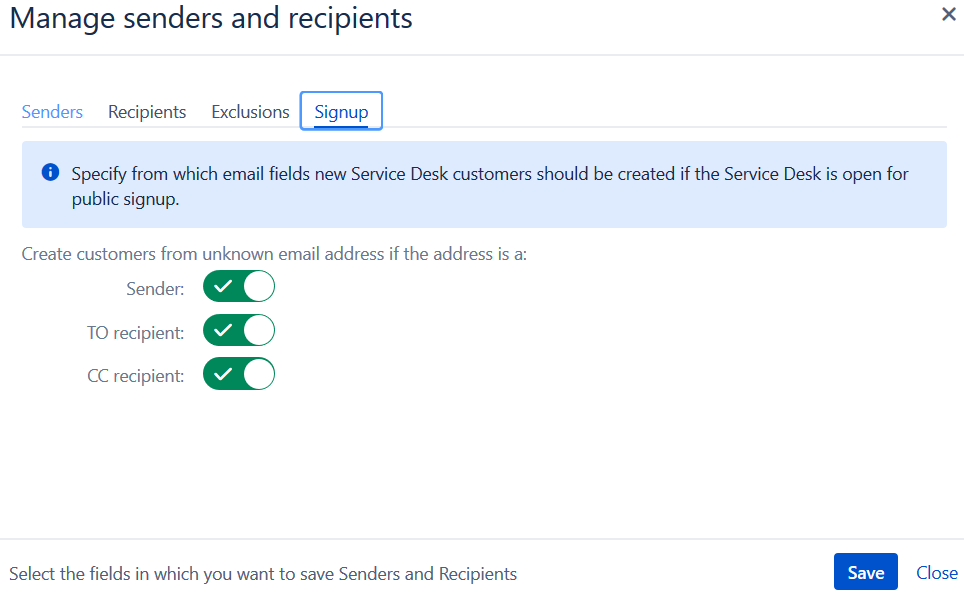
In native Jira email handling, I could opt for customers being created automatically from incoming emails. How do I do that with Email This Issue? | This setting is part of the basic JSD behavior, the Classic mail handler uses this, however, it is not a configurable setting. | The Next-Generation mail handler offers configurable customer creation in the Manage Senders and Recipients action - Signup tab. |
Emails take too long to be processed. Is this an Email This Issue bug? What should I do? | No. In the case of classic Email This Issue Mail Handlers we do not have access to your inbox. The average time for an email to be processed is within 2-3 minutes. Anything longer than this could be considered a problem, however, it depends on how many emails there are in your inbox.
Clear your inbox, remove all emails (place them in another folder) except those you want to be processed. Leave the remaining emails “unread” so that Jira can pick it up.
Alternatively switch to a Next-Generation email this issue mail handler. | If the processing time of your emails is more than 2-3 minutes, an investigation can be started.
Next-Generation Mail Handlers process emails differently and by default faster than the classic mail handler as it is independent of Jira. The processing time depends on how many emails you get within a short period of time, but if you experience delays, open a request at our customer portal. |