| Info |
|---|
In this guide, we are showcasing how to set up a service desk with Email This Issue's next-generation mail handler through the example of a company's HR department who is testing the new handler. |
Pre-requisites before setting up the handler
In order to ensure working in the above scenario, a number of settings will need to be configured on both Jira's and our app's site which we will not detail in this documentation.
| Note |
|---|
We have configured our test case with the below settings and will be detailing our step-by-step guide based on them. You may defer from these settings as required, this is only meant to be a basic setup to showcase a new functionality. Differing setups will yield different results, please keep that in mind when creating your unique setup. For more information, refer to our documentation. |
You should have your Jira-related setup ready before creating the mail handler, such as:
- Three custom fields created in Jira:
- one multi-user picker field called Internal participant
- one single-line text field called External participant
- and one select list (single choice) custom field called Customer Category with the options "Regular" and "VIP"
- Proper permissions set up for agents and customers, including a technical user who will be your default reporter
- Project-level Customer permissions set up according to your needs
- Workflow configured with the transition property "jeti.on.email.transition" on a re-open transition
You should have some Email This Issue-related setup ready before creating the mail handler as well, such as:
- One template for the "Issue created" notification. We recommend that you create it based on the Theme: Service Desk Request Created
- One notification set up in Email This Issue for the "Issue created" event with the above template
- One context set up with the above notification (recipient being the reporter)
- SMTP server setup and mapped in the context (alternatively use Jira's built-in SMTP connections)
- Have a Mail Account setup for the mail handler
Use-case
HR would like to open requests via email every time a new employee needs to be hired (a new request opened) and comment on those requests when there is a reply in connection to the original email.
When a request is opened, an email should be sent to the reporter, notifying them of a successful request creation.
If a new request is created from an email with the sender address ending in "@gmail.com", the customer category of the request should be set to "VIP" (as they need to process these requests in a different manner).
When the customers send a reply email, a public comment should be left on the issue, while an agent's reply should always leave an internal comment. Related issues should be found by issues keys appearing in the email subject.
In both cases of new and reply emails, the senders and the recipients should be saved as follows:
- By default, email senders are saved as Reporter in newly created issues
- User senders without (create issue and browse) permissions should be saved in a custom field called "Internal participant"
- Senders unknown to Jira should be saved in a custom field called "External participant"
- SD Customer recipients should be saved as Request participants
- SD Agent recipients should be saved as Watchers
- User recipients with (create issue and browse) permissions should be saved as Watchers
- User recipients without (create issue and browse) permissions should be saved as Internal participants
- Recipients unknown to Jira should be saved as External participants
If the sender does not have permission to either open a request or leave a comment, a technical user should take action in the name of the sender.
It is also important for them that only relevant emails create requests and that reply emails to the Issue Created notifications are cut. This way, their comments will be short and only include relevant information.
When the request is resolved and it is in "Done" status, it should be re-opened upon a new comment being added to the request.
Step-by-Step Guide
This section only details how to set up the next generation mail handler for your service desk project. Its goal is not to detail any Jira-related setup or any Email This Issue-related pre-requisites, but show the setup of a new kind of mail handler.
We are going to be working only in the Mail handler menu of Email This Issue, and show the configuration of just this part of the app.
For this, navigate to Email This Issue administration - Mail Handlers.
- Click on +Add and select Add Next Gen Mail Handler from the dropdown list.
- Fill in the fields with the below information, making sure to add a name and a mail account as well as a technical user for "Default reporter". This user should have all permissions to create issues and add comments on the project. You can always open this dialogue by clicking on the three dots at the end of the handler's row and clicking on Edit.
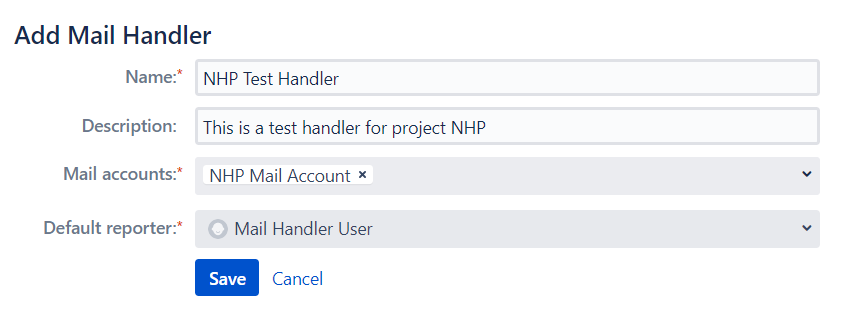
Click on Save to save the settings or Cancel to exit this configuration without saving. Once the handler is saved, it is displayed in the list of Next Gen Mail Handlers as "DISABLED".
Info You will need to click on the three dots and "ENABLE" eventually, to ensure its working, however, you may also carry out this step after having the mail handler configured.
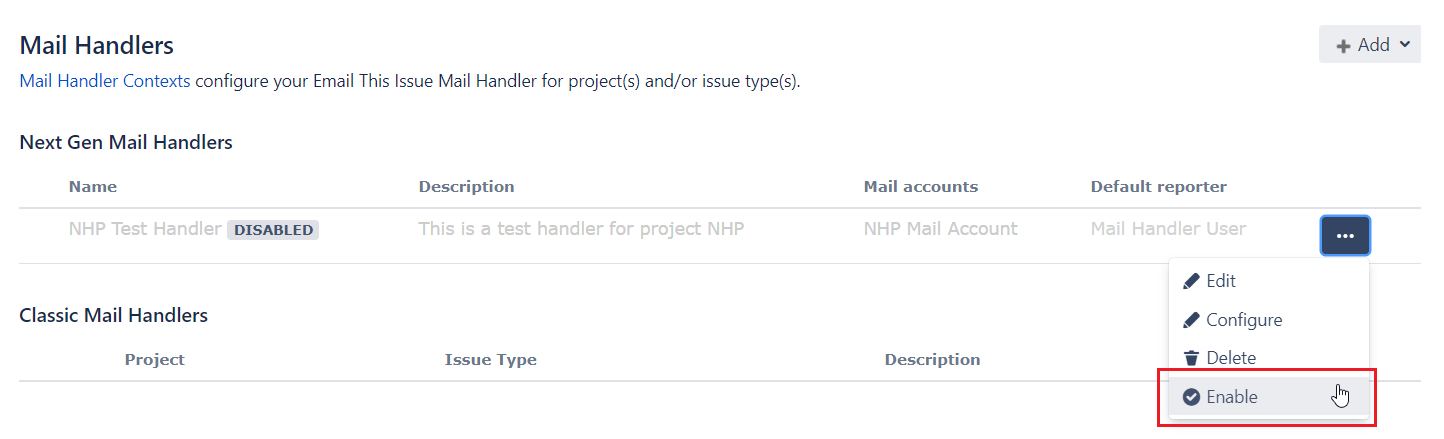
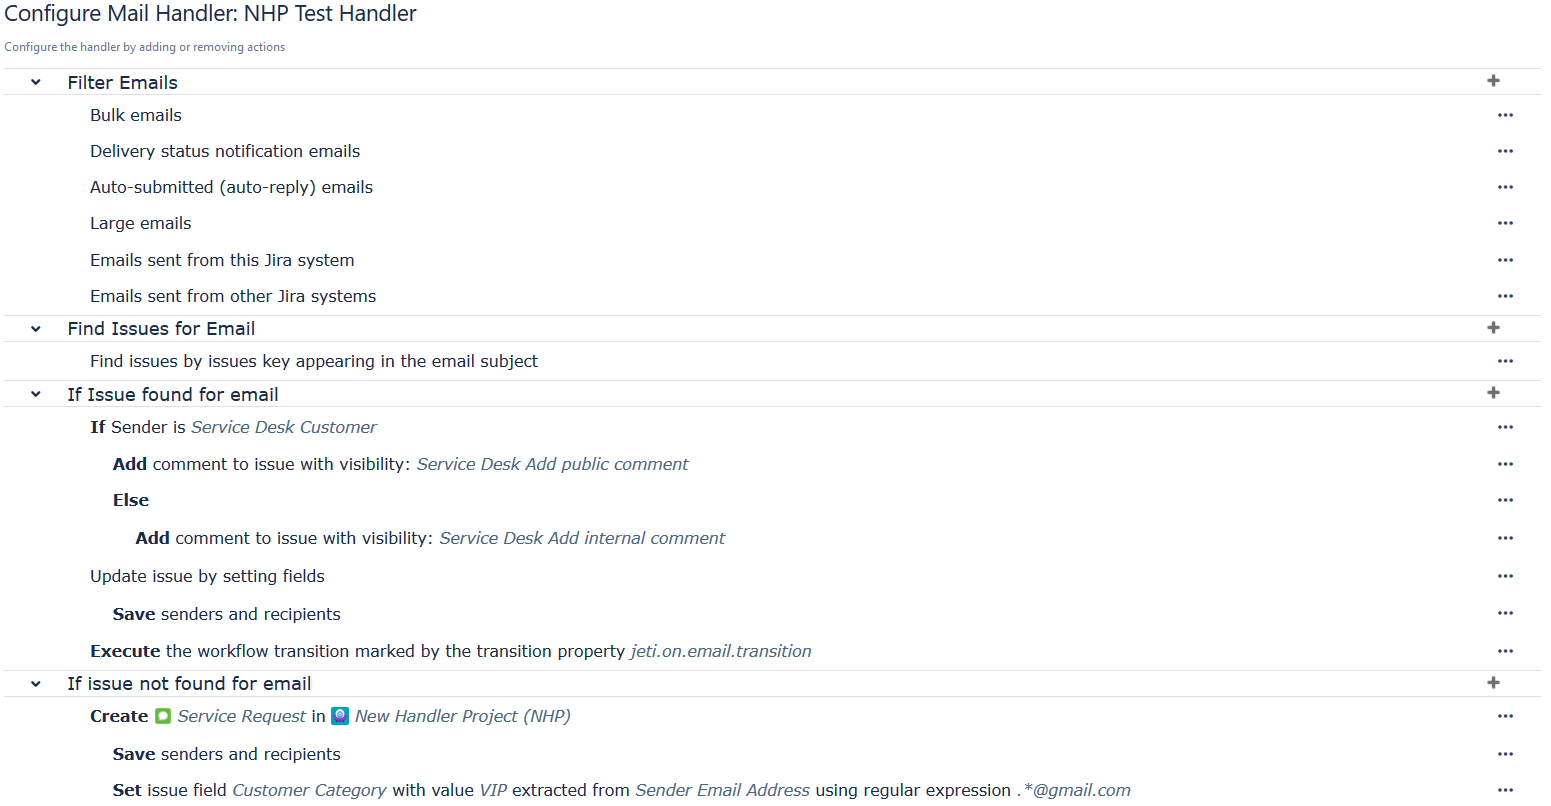
- Click on the three dots and then Configure to open the setup page for your new mail handler. There are four sections presented that need to be configured in a next-gen handler:
- Filter Emails: set up by default, filtering emails that could be spam messages, large emails or emails of similar nature that you do not want to get processed. Leave it as it is, for now, it will filter emails based on the below attributes:
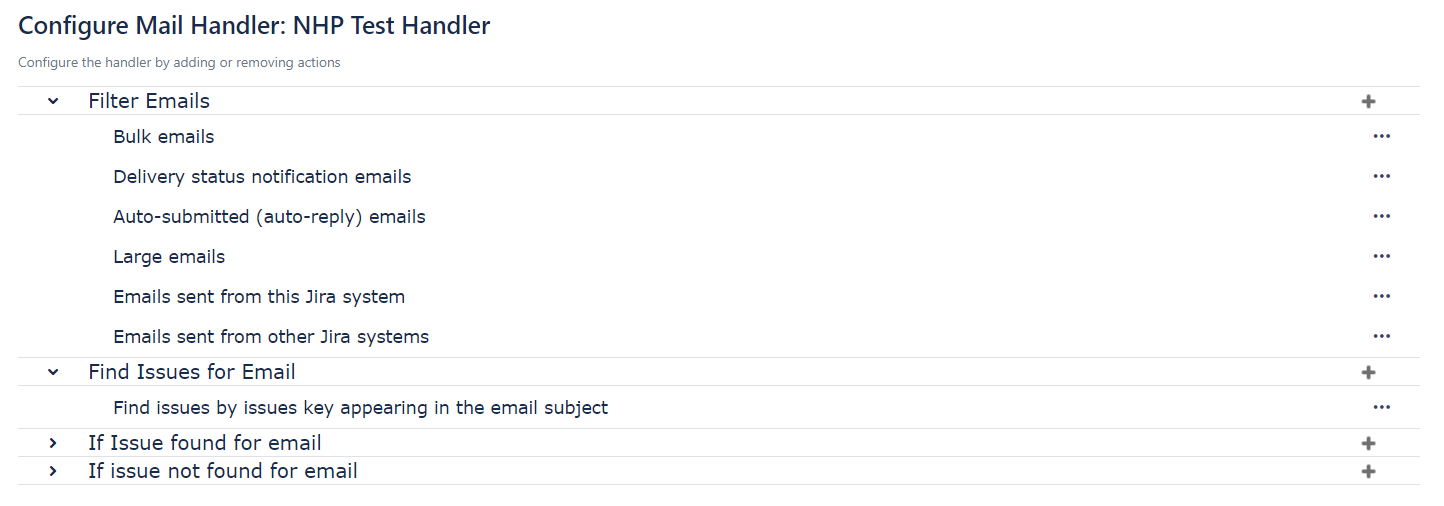
- Find Issues for Email: set up by default as "Find issues by issues key appearing in the email subject". Leave it as it is, for now, it will find related issues based on the issue key in the reply emails.
- If Issue found for Email: actions to take when an issue is found based on the issue key in the email's subject.
- If Issue not found for Email: actions to take when an issue is NOT found based on the issue key in the email's subject.
- Filter Emails: set up by default, filtering emails that could be spam messages, large emails or emails of similar nature that you do not want to get processed. Leave it as it is, for now, it will filter emails based on the below attributes:
To configure the actions "If issue found for email", click on the + icon at the end of its row. For our configuration, first, click on Condition to create an IF statement. Define the "Email Sender is" parameter as "Service Desk Customer" and click on Save:
Click on the + icon at the end of the "If Sender is Service Desk Customer" row we just created, then click on Add Comment. Set the "
Code Block language java \s*From:|___.|On|On .wrote:|----Orig.|On .(JIRA).
Leave the "
Click Save to carry on with the rest of the configurationClick on the + icon at the end of the "If Sender is Service Desk Customer" row we just created, then click on Else to create a condition for when the email sender is not a service desk customer.
Click on the three dots at the end of the Else row and select Add comment. Set the "
Code Block language java \s*From:|___.|On|On .wrote:|----Orig.|On .(JIRA).
- Click on the + icon at the end of the "If Issue found for email" row, then click on Update issue to create an action that runs separately from the IF-ELSE conditions we created. This means that this action will be carried out by the handler regardless of the project role of the sender.
- Click on the three dots at the end of the "Update issue by setting fields" row we just created, then click on Save Senders and Recipients.
- On the Senders tab, set the "
- On the Recipients tab, also set the "User w/o permission" field's value to the custom field Internal participant and the "
- Click on the + icon at the end of the "If Issue found for email" row, then click on Execute Workflow Transition to create an action that runs separately from the "IF-ELSE" conditions we created earlier. This means that this action will be carried out by the handler regardless of the project role of the sender.
A dialogue is displayed, where only one attribute has to be configured in our use-case: the "Select transition" option has to be set to By transition property. This is selected by default, but if you are editing a handler and this is not the default value, select this option and click Save..gif?version=1&modificationDate=1580125794318&cacheVersion=1&api=v2&width=850)
If we are taking a look at our handler, it should now look like this: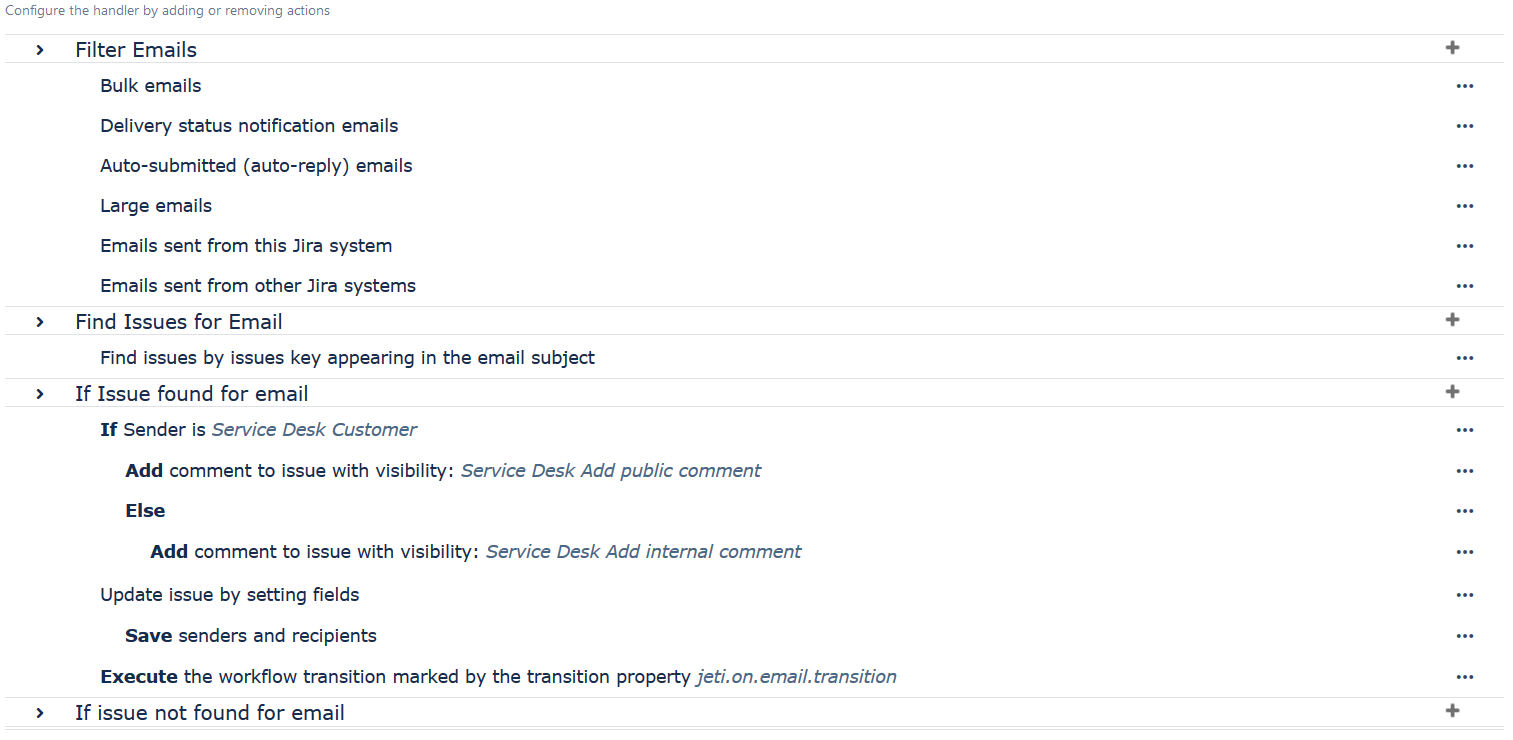
- To configure the actions "If issue not found for email", click on the + icon at the end of its row. For our configuration, click on Create issue and define the parameters according to your project and issue type. In our case, the "Project" is New Handler Project, the "Issue Type" is set to Service Request and the "Request Type" is New employee.
Set the "Add attachments" field to Always add attachments, leave the split regex field empty and leave the "Attach original email as .eml file" disabled for now:
- When a Create issue action is created, a Save Senders and Recipients action is automatically created as well. Click on the three dots at the end of the "Save Senders and Recipients" row that just has been created, then click on Edit.
- On the Senders tab, set the "
- On the Recipients tab, also set the "User w/o permission" field's value to the custom field Internal participant and the "
- As a last configuration step, click on the three dots at the end of the "Create Service Request (New employee) in New Handler Project (NHP)" row.
For our configuration, click on Set issue field and define the parameters as below:.gif?version=1&modificationDate=1580129186516&cacheVersion=1&api=v2&width=850)
- Click on Save to finish configuring your mail handler, which should look like this by the time you're done:
Setup Results - Summary
If the above steps have been followed correctly, a request with comments should be created from the incoming email as follows:
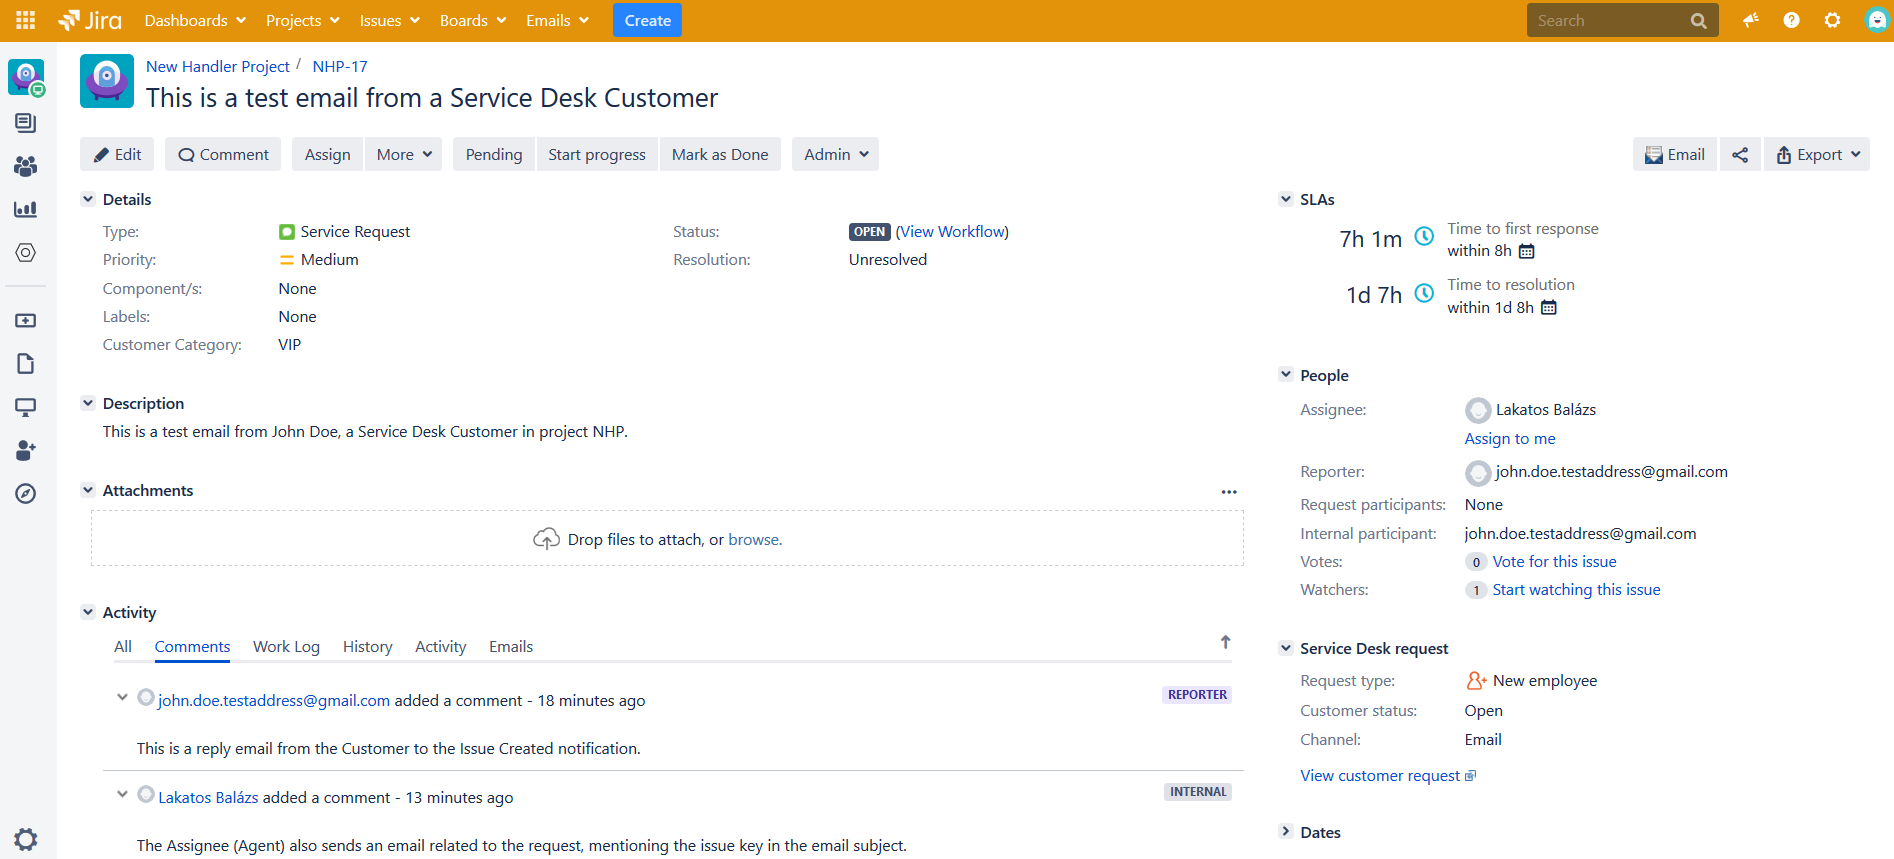
It is visible that as per our guide, the issue is created in the New Handler Project with the Service Request issue type and New employee request type.
The email's sender is set as the reporter, the
Because of the field rule, the Customer Category is set to VIP as the reporter's email address ends in the domain "gmail.com".
Two comments are left on the issue:
- a public comment from the reporter which is a reply email from the customer to the Issue Created notification
- an internal comment from the assignee (who is an agent) that is related to the request and mentions the issue key in the email subject.
Related articles
| Filter by label | ||||||||||||||||||
|---|---|---|---|---|---|---|---|---|---|---|---|---|---|---|---|---|---|---|
|
| Page Properties | ||
|---|---|---|
| ||
|