...
| Status | ||||
|---|---|---|---|---|
|
...
Handlers of this type prove to be simpler and more powerful than the Classic Mail Handlers in Email This Issue. They are also future proof, i.e. more development efforts are allocated to add more and more new features to these handlers.
In contrast to the Classic Mail Handlers, this new handler type does not require or use any incoming mail accounts or handlers from Jira's Incoming Mail page. This is a standalone, Email This Issue-only component which makes it separated from limitations or malfunctions Classic handlers inherit from Jira.
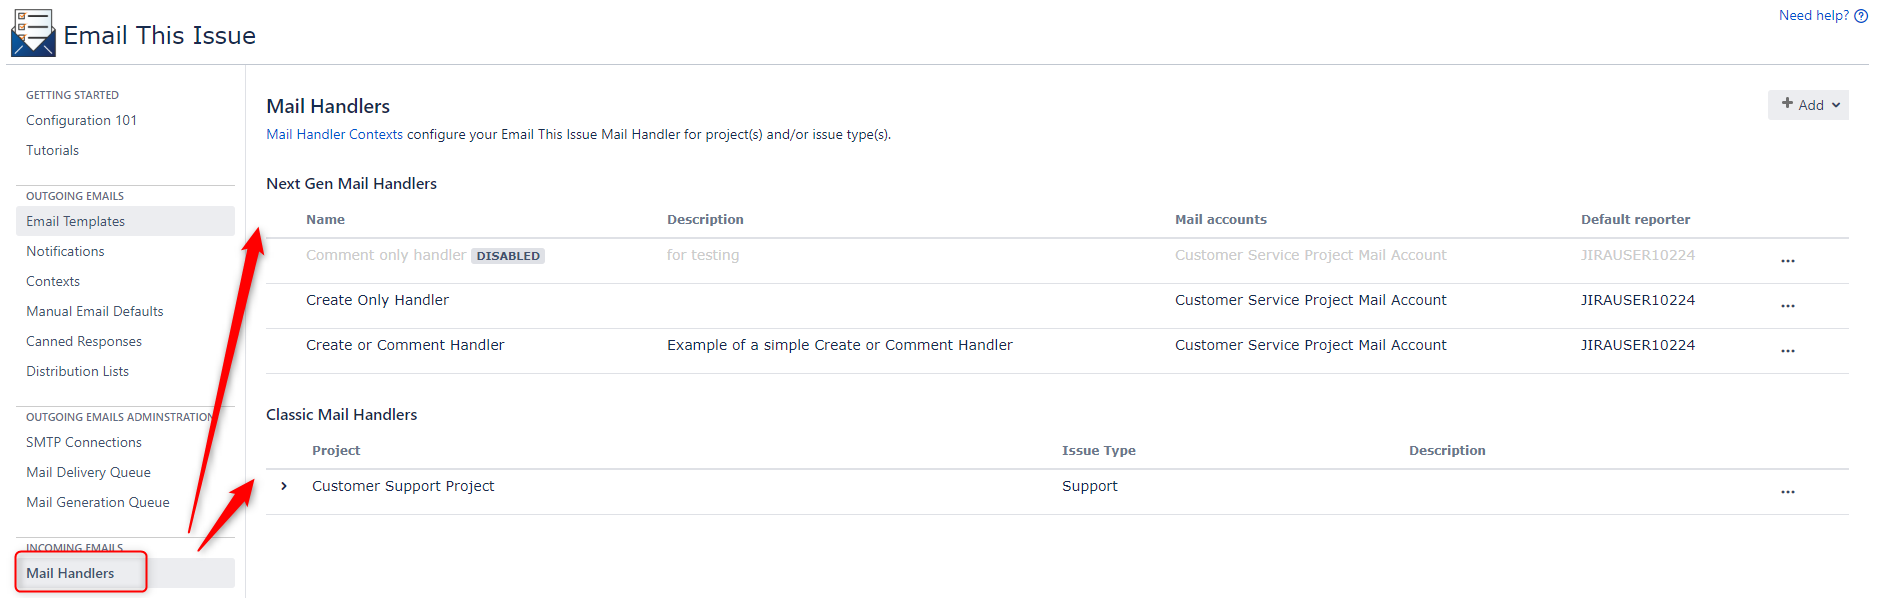
Mail handlers can be accessed from the app's administration page. Mail Handlers are displayed separately - Classic Mail Handlers and Next Gen Mail Handlers are shown as follows:
Add or Edit a Next Gen Mail Handler
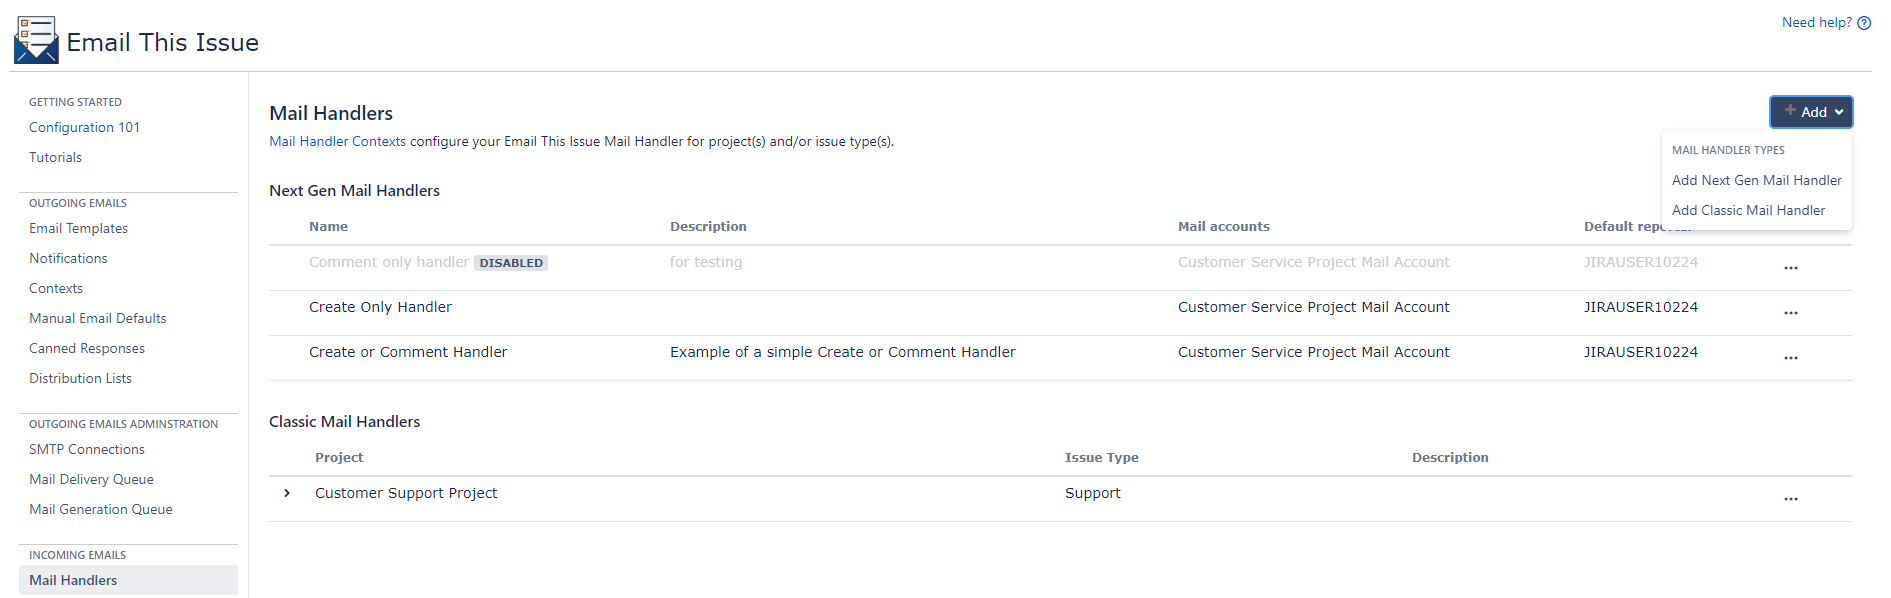
Next Gen handlers may be added using the + Add button.
 in
in
Handlers are composed of two main sets of attributes:
- Basic attributes
- Configurable Handler Actions
Basic Attributes
When you add or edit a handler, the following attributes can be specified as basic attributes:
...
Incoming Mail accounts from which the handler receives the incoming emails.
These accounts are defined in Email This Issue and are independent of the mail accounts defined in Jira.
Next Gen Mail Handlers may be used with multiple mail accounts which makes them ideal to provide a single channel to process emails sent to different mailboxes (you can use more than one email addresses for one project).
...
The default account used to create issues or requests and add comments when the email sender is not permitted to carry out these operations.
| Note | ||
|---|---|---|
| ||
In order to make the handler fully compatible with Jira Service Management, the default reporter must have Project Administration and Service Management Agent permissions. It is typically achieved by assigning the default reporter to the Administrators and Service Management Team project roles and assigning Service Management application access. When the handler is configured to work with a non-Service Management project, the default reporter must have Browse Projects, Create Issue, Create Attachments, Add Comment, Manage Watchers, Transition Issues permissions. |
...
Handler Operations
Next Gen mail handlers offer a few operations via the action menu:

...
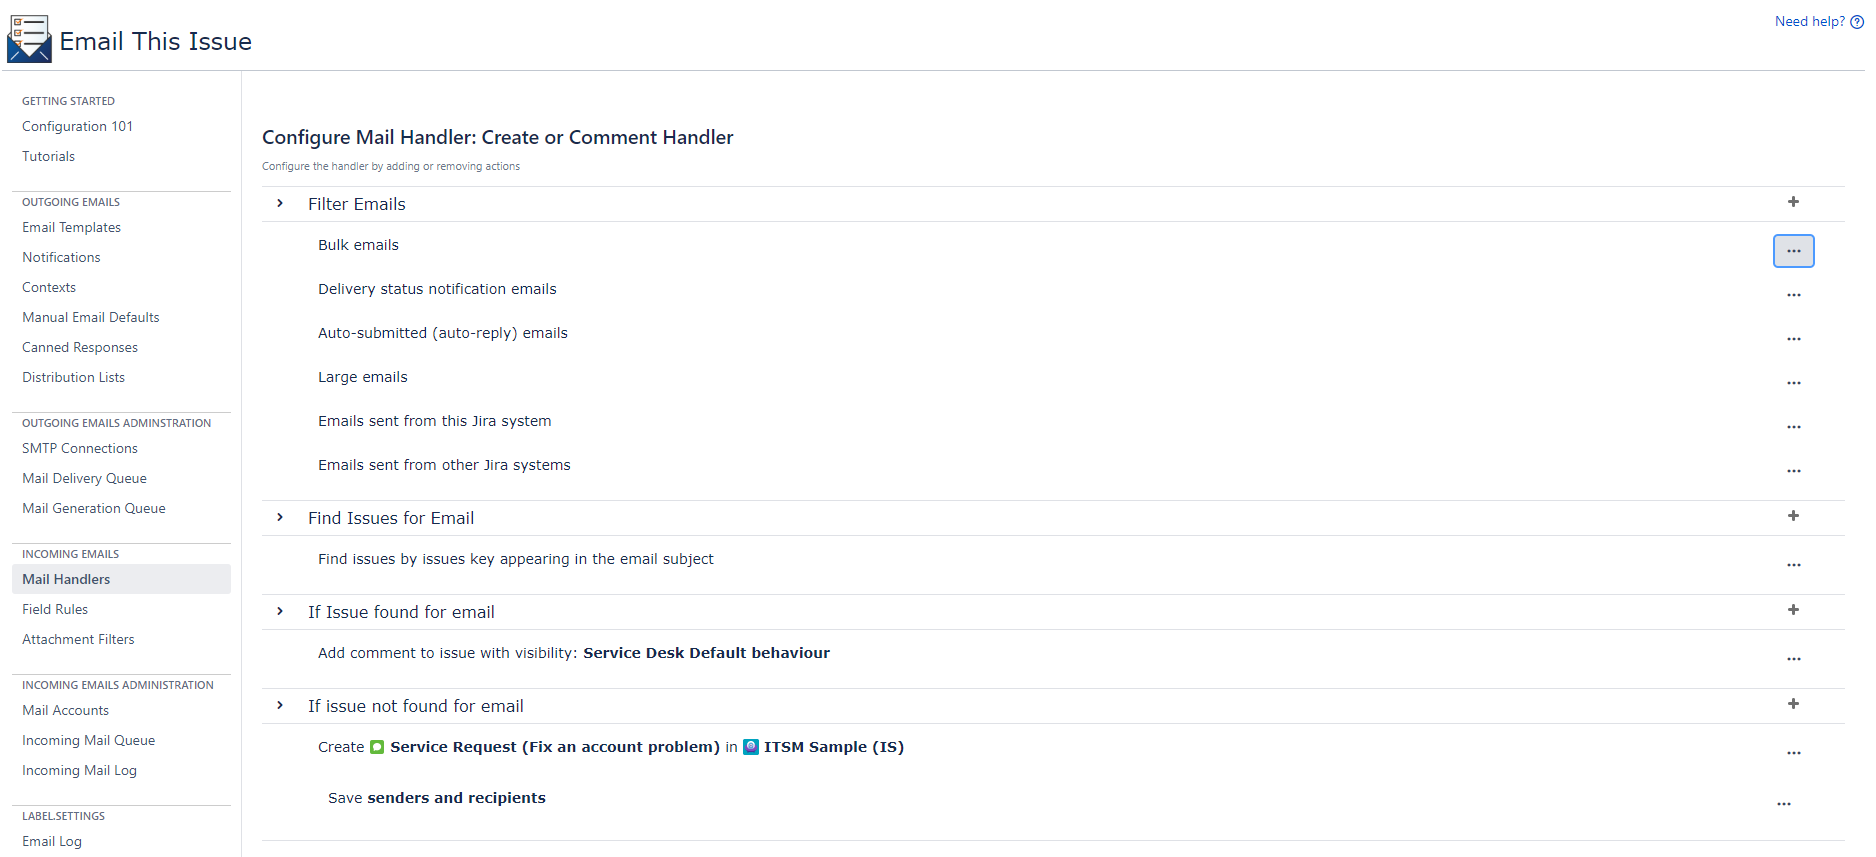
General Behaviour of Mail Handlers
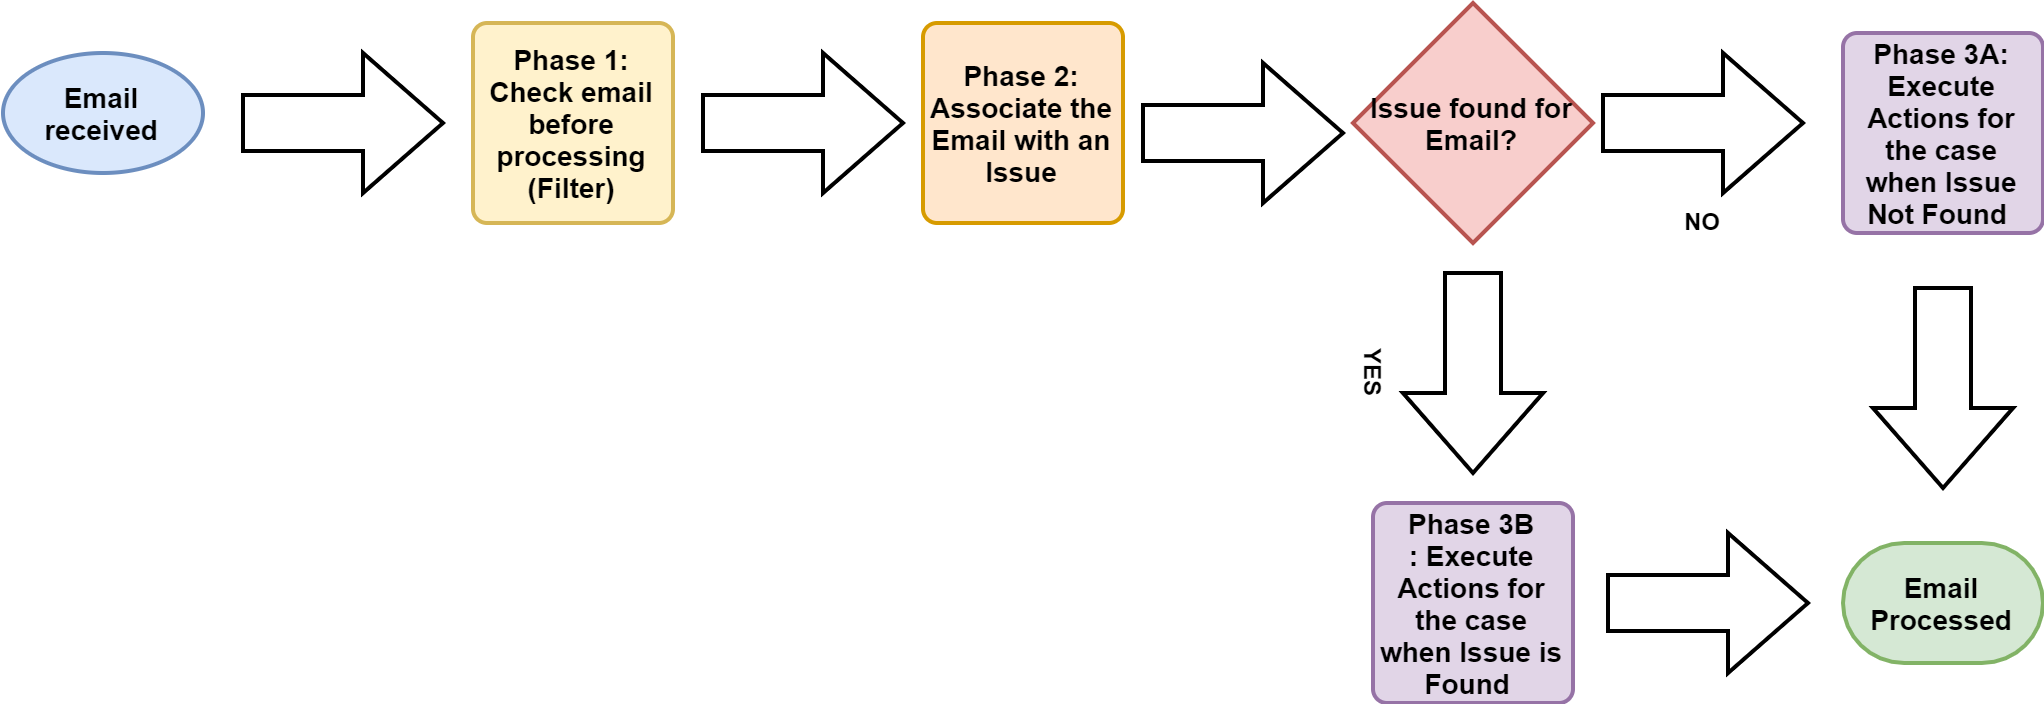
Mail Handlers (regardless of them being Classic or Next Gen handlers) follow the same scheme of behavior. They process emails in three phases as shown in the diagram below:
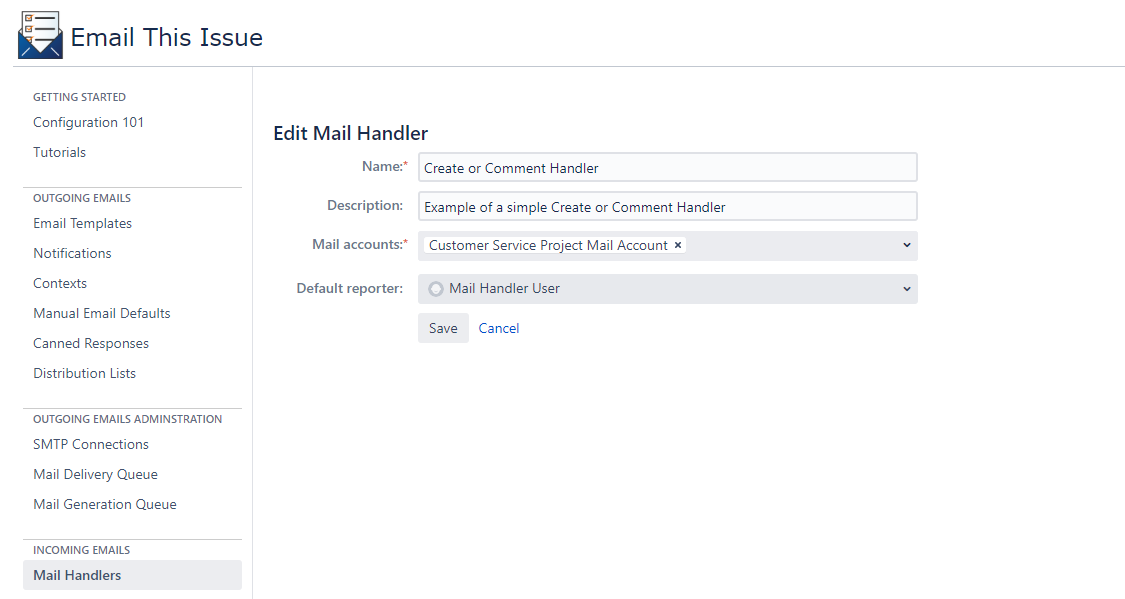
Below is a very simple Create or Comment type handler. The sections in the handler correspond to the above-mentioned phases:
Configure a Next Gen Mail Handler
Unlike the Classic Mail Handlers, Next Gen Mail Handlers are not configured via a huge input form crowded with dozens of fields and options, but they are built from small, configurable actions. Each of them performs a very specific operation.
The actions in each section are invoked in the order they are listed. Common operations of each action:
- Edit: modify the parameters in the actions (not available to all action types)
- Move up: moves the action up by one position
- Move down: moves the action down by one position
- Delete: deletes the action from the handler
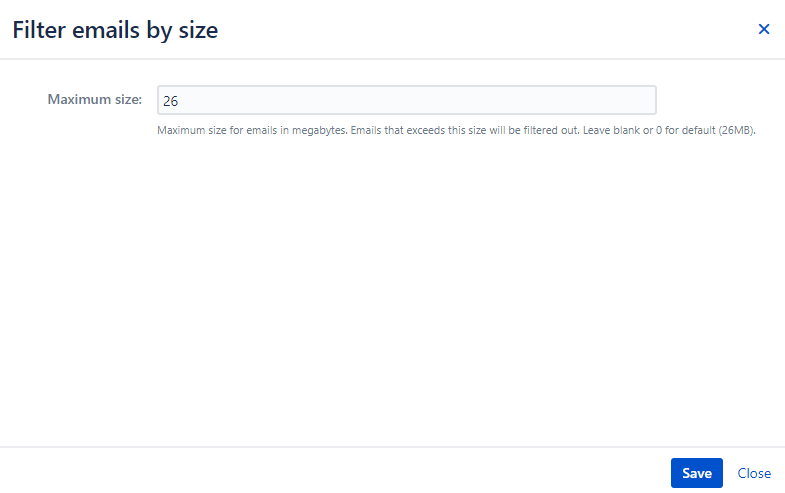
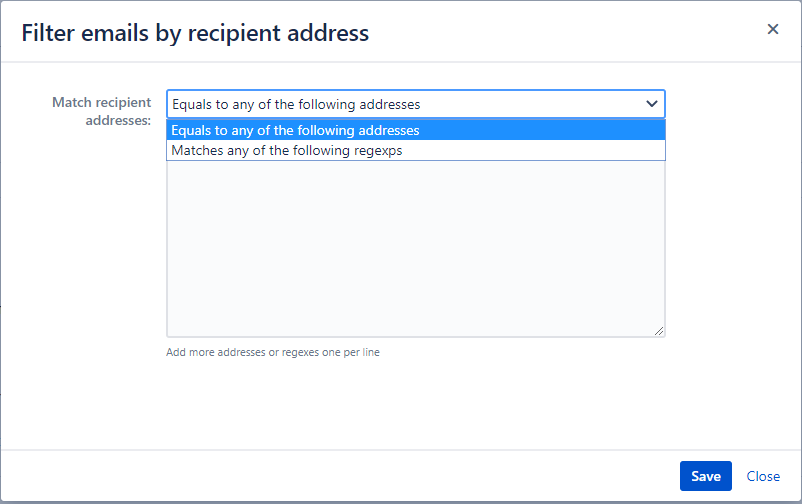
Email Filter Actions
Email filter actions check different characteristics of the incoming emails. If an email passes a filter, the next filter is checked. If an email does not pass a filter, then the process stops and the email is marked as filtered out and will not be processed.
There may be multiple filter actions added to a handler. To add a filter action, use the + icon.

Available Email Filter Actions:
...
Filters out delivery notification emails, which means emails with content type report-type=delivery-status
...
Filters out auto-submitted (auto-replied, auto-generated, auto-notified) emails such as OoO mails.
This includes emails with header Auto-Submitted set to anything else but "no"
...
Filters out emails larger than a specified size threshold (which is 25MB by default) including attachments.
...
Filters out emails that were not sent to recipients configured in this action. You can specify multiple email addresses or regular expressions that will be matched against the recipients (To, Cc) of the email. Unless either of the recipients matches any of the email addresses or regular expressions, the email is filtered out.
...
Filters incoming emails by the senders email address
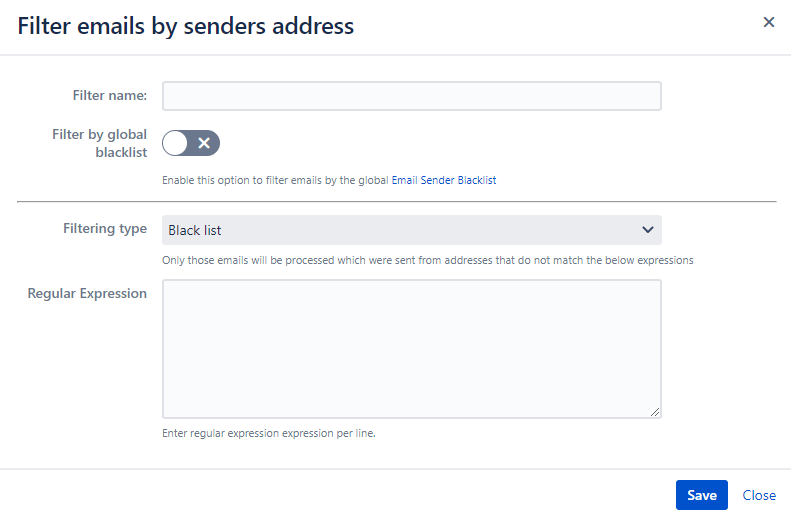
Filter Name: name of the filter item, you can add more of this filter to the handler with a unique name
Filter by global blacklist: there is a global sender blacklist available in General Configuration, enable this option to use it in this filter
Filter type: if not using the global blacklist, you can specify if this filter accepts or refuses emails sent from addresses matching the regular expressions
Regular expressions: these regexes (Java format, one per line), are matched against the sender's address. If one of the regexes matches, we accept or refuse the email depending on the type being whitelist or blacklist. As a safety measure, please always start your regex with (?i) when matching email addresses.
...
| Status | ||||
|---|---|---|---|---|
|
Filters out emails if the regular expression matches the text in the configured email attribute.
You may define a Template to send a bounce email if this filter rejects the incoming email.
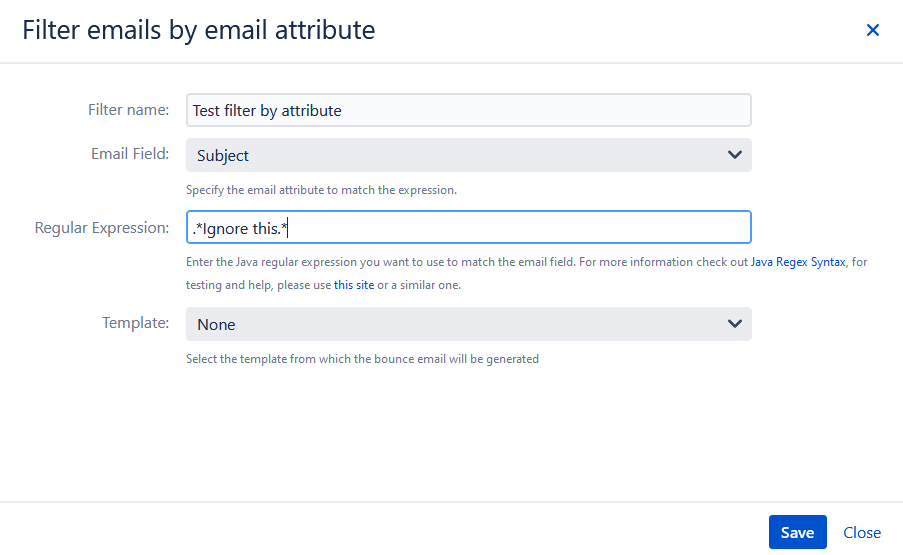
- Email Field: specifies the email attribute that is matched against the regular expression:
- Subject
- Body
- Recipients
- Senders
- Email Headers → in this case a new field appears where you can define the Header name.
- Regular Expression: the expression that matches and extracts content from the email field. As a safety measure, please always start your regex with (?i) when matching email addresses.
- Template: The selected template to send an automatic bounce email. Only Templates with "Bounce email" category appears in this list.
Find Issues for Emails
This part of the handler contains Issue Lookup Actions whose responsibility is to find issues associated with the email using different approaches. The approaches to find issues associated with emails are:
- Find issues by the issues key appearing in the email subject
- Find issues referenced by the In-Reply-To or References headers
- Find issues by a JQL query composed of the email attributes
There may be multiple issue lookup actions and they are executed in the order of appearance. If a lookup action finds a single matching issue, the rest of the actions get executed and the issue is later used by the handler.
If the lookup actions do not find any issues or find multiple issues, it is considered as no issues are associated with the email and the email is not processed.
Lookup actions may be added by clicking the + icon.
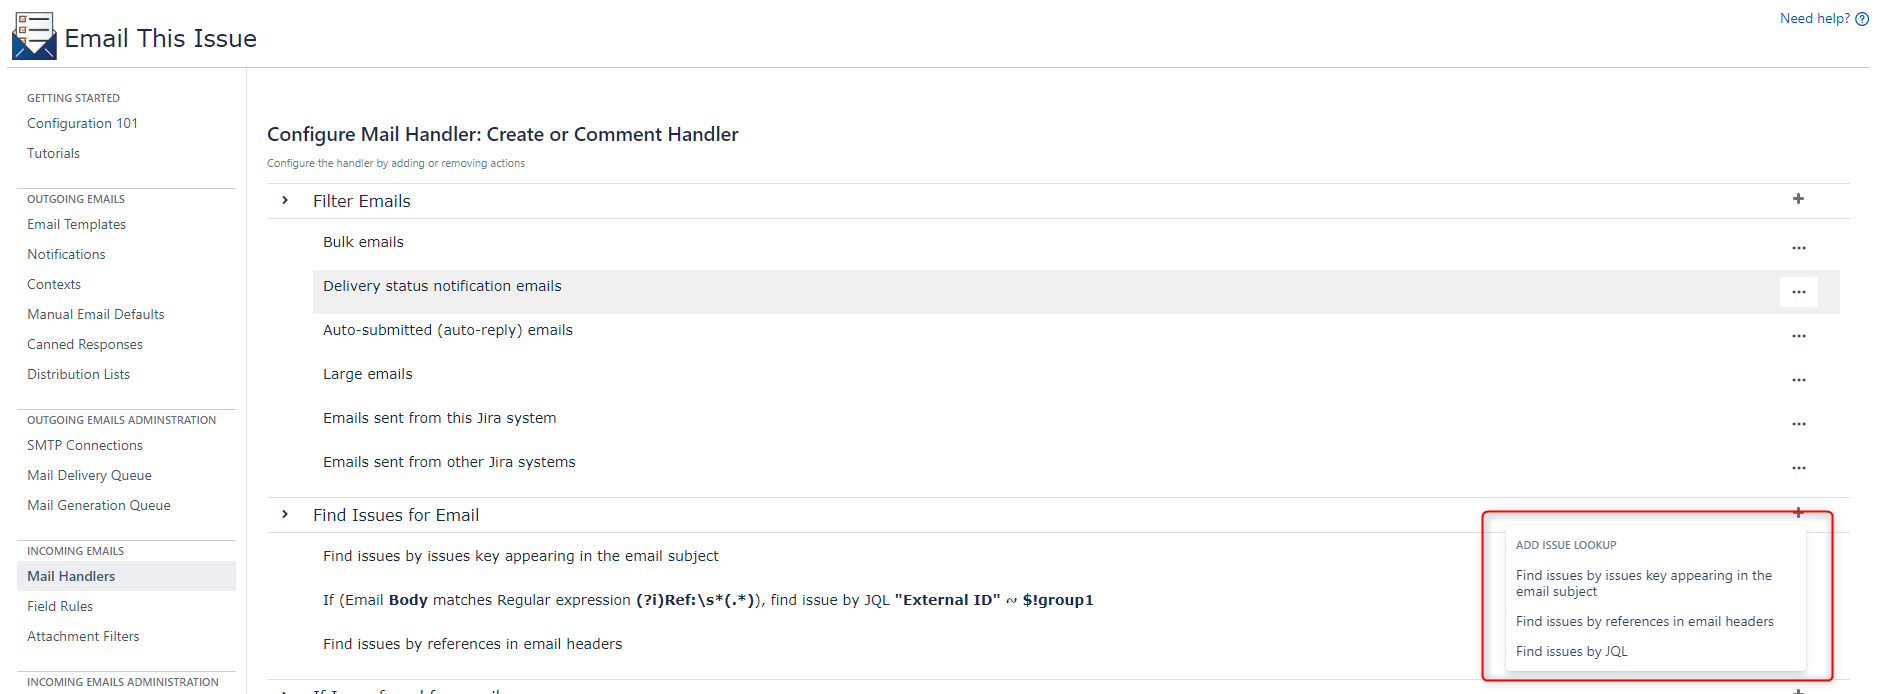
Available Issue Lookup Actions:
...
This is the most well-known form of mapping emails to issues. If an issue key appears in the subject, the handler looks up the issue and will use it later on during the process.
If more than one issue keys are included in the subject, they are evaluated from left to right.
...
This lookup action extracts content from the email and executes a JQL query to find the issue:
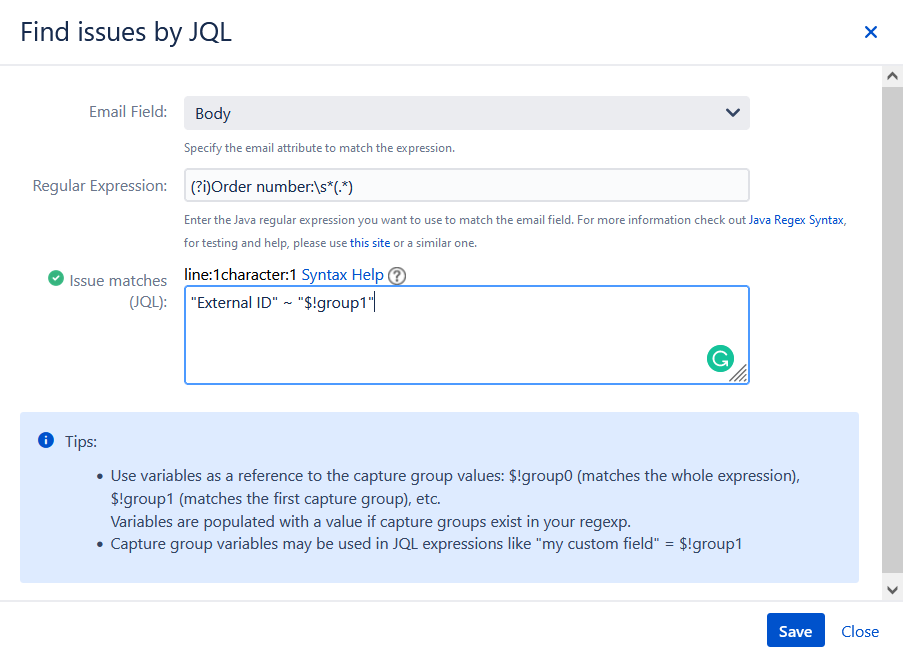
- Email Field: specifies the email attribute that is matched against the regular expression:
- Subject
- Body
- Recipients
- Senders
- Email Headers
- Regular Expression: the expression that matches and extracts content from the email field. As a safety measure, please always start your regex with (?i) when matching email addresses.
- JQL: the JQL that is composed of the extracted content referenced by capture groups and locates the issues. For example, in the above image, you can see that we check if the incoming email's body matches a regular expression against an issue in which the "External ID" custom field has the regular expression's first capture group ($!group1) as a value. If it only finds one exact match, the issue will be found, if it finds more than one matches, the issue will not be found.
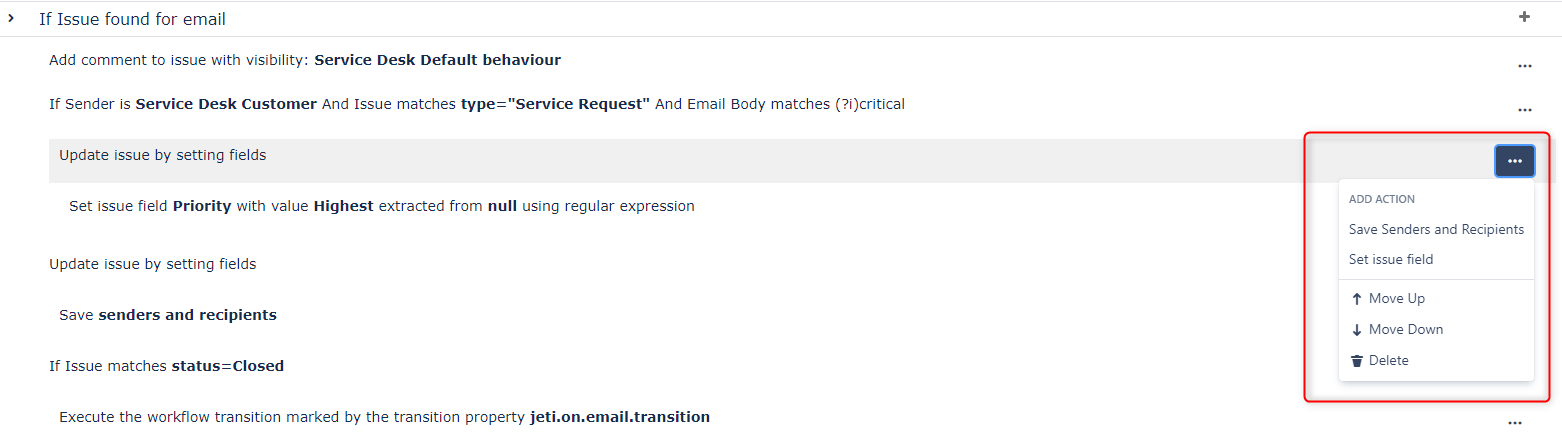
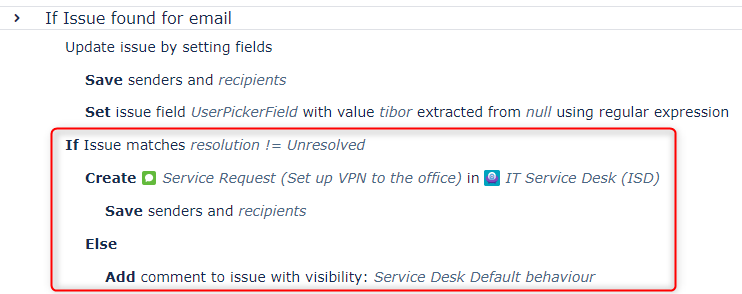
Manipulate Existing Issues
The "Issue found for email" section of the mail handler is composed of actions that are executed if the handler could associate an existing issue with the email that is being processed. Unlike the Filter Emails and Find Issues sections, which include actions of the same kind, this section has a variety of different actions.
Actions may be added by clicking the + icon of the section.
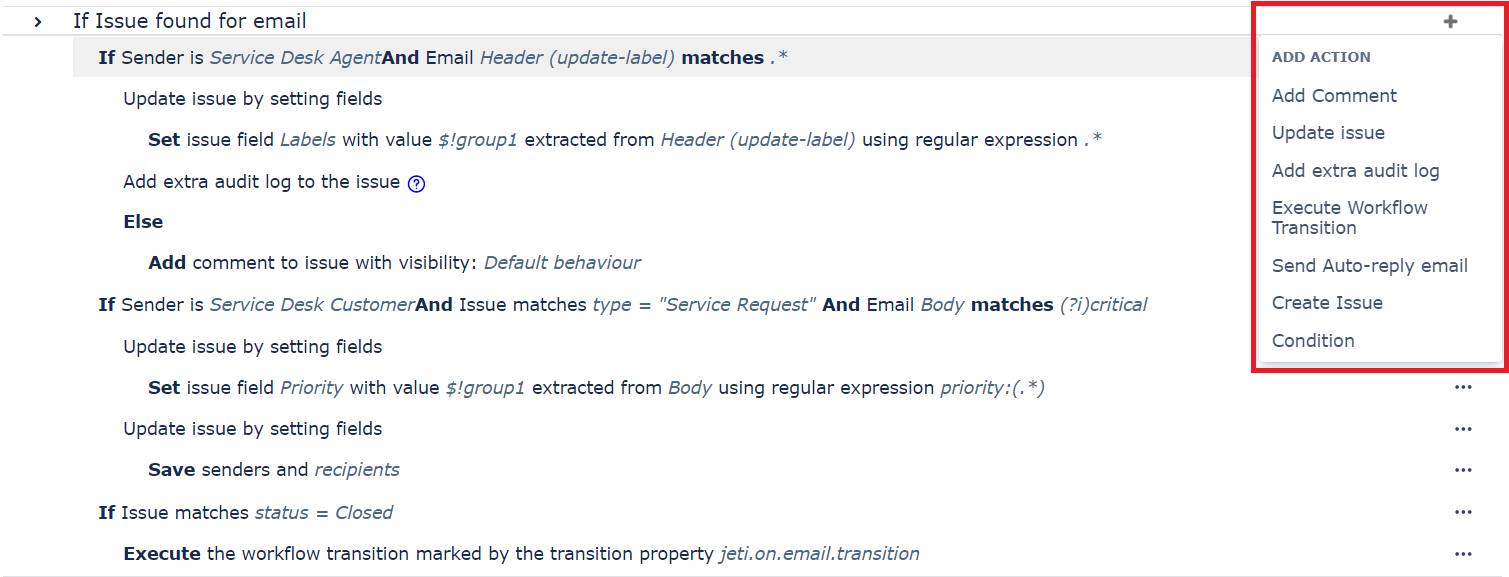
The summary of actions to be used here is as follows:
...
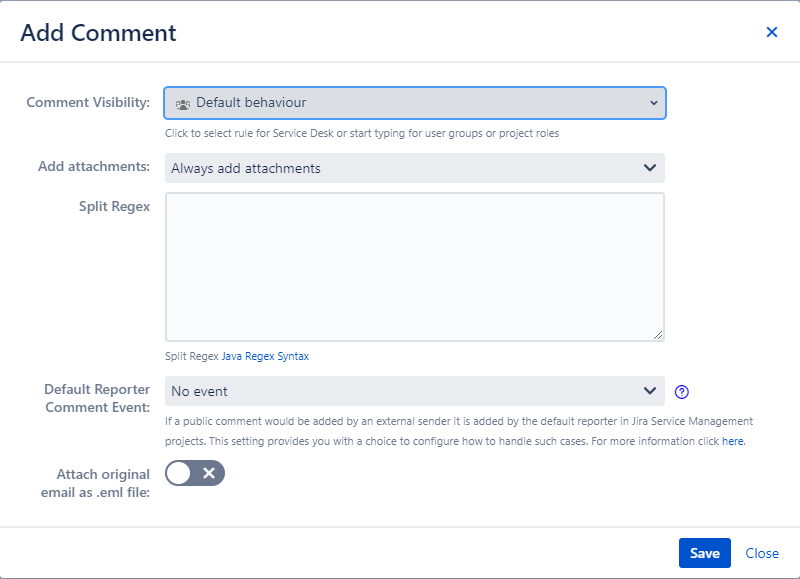
Add comment to the issue
This action adds a comment to an existing issue that is found by the issue lookup commands. The action may be configured based on the below popup dialog:
...
Defines the visibility of the comment added by the action.
For Service Management projects, options include:
- Default: comment will be public if added by a Customer of the request, or by an agent
- Internal: all comments become internal (comments by customers will be added by the default reporter)
- Public: all comments will become public (comments by collaborators will be added by the default reporter)
- Public if customer: only customers comments will be public
For Software and Business projects, a user group or project role may be selected.
...
Defines how the action handles attachments in the email. Options include:
- Always add Attachments
- Do not add Attachments
- Do not add attachment if one with the same name exists
- Do not add attachment if one with the same name and size exists
- Filter attachments using the Attachment Filters
...
If a public comment would be added by an external sender it is added by the default reporter in Jira Service Management projects. This setting provides you with a choice to configure how to handle such cases.
- No event: The comment does not trigger anything in the system. This means that there will be no Service Management events thrown, automations will not be triggered, Email This Issue or Jira Service Management notifications will not be sent, but the SLA remains intact.
- Email This Issue Event: The comment only sends notifications from the app. This means that there will be no Service Management events thrown (Jira Service Management notifications will not be sent), no automation will be triggered, but Email This Issue notifications will be sent and the SLA remains intact.
- Service management Event: The comment is added as if it was left by an administrator. This means that Service Management events will be thrown as usual, automations will be triggered as usual, Email This Issue and Jira Service Management notifications will be sent but your SLAs will not work as they should (they will be stopped by the comment even if they should not).
...
Update Issue
This action is simply a placeholder of actions that modify the issue fields. It has no attributes to configure. Child actions may be added via the eclipse menu.
Add extra audit log
This action adds an additional audit log to the incoming mail log, and the incoming email will be visible on the email's tab.
This option may be used when you would like to update an issue without adding a comment (for example modify a field) but you need it to show in the request (in the email tab).
This action is non-editable, it may only be added or removed from the list of actions.

...
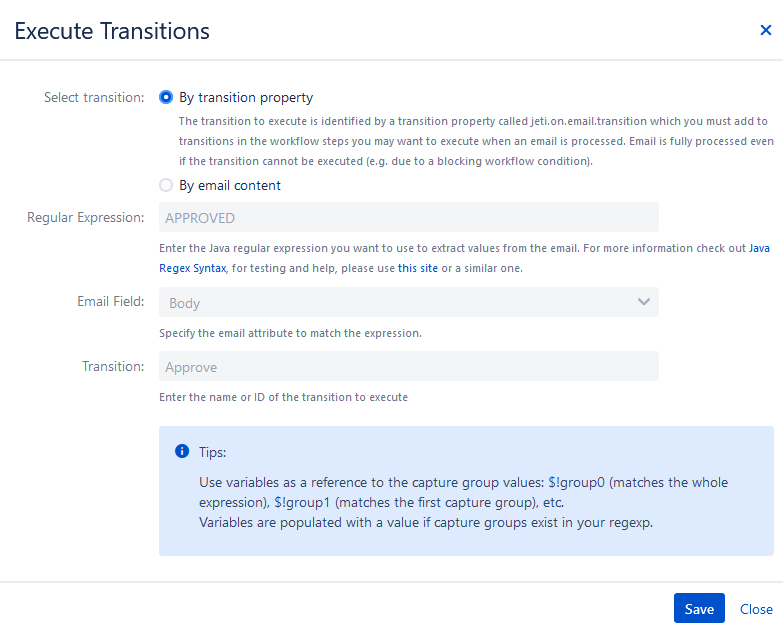
This action executes a workflow transition on the issue. The transition to execute is either determined by a transition property or by email content. The action may be configured based on the below popup dialog:
...
Defines how a transition to be executed is selected. There are two options:
- By a transition property: adding the property jeti.on.email.transition to a transition (with value true) will mark it to be executed.
- By email content: if this is selected the email content may determine the transition to execute.
...
Example: execute the transition named in the email body
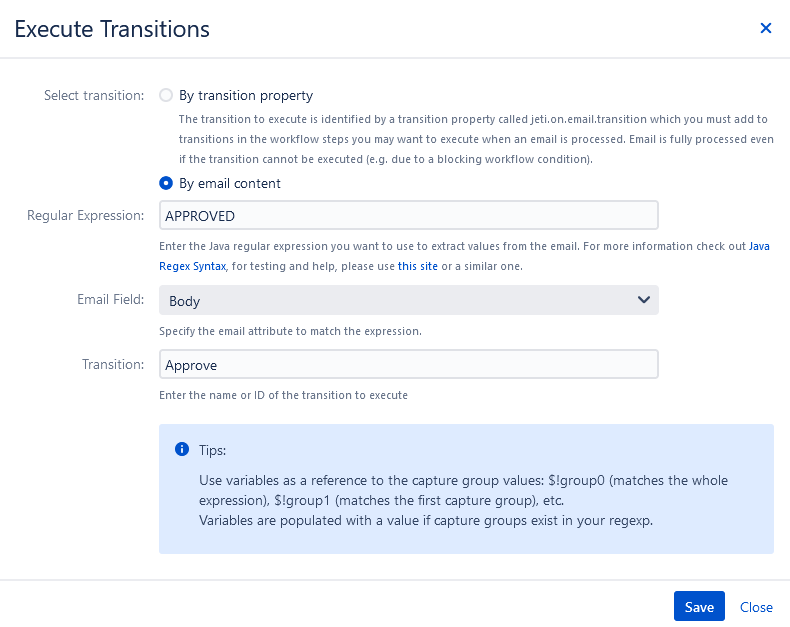
It is perfectly valid to simply provide the transition name without any email or regex values:
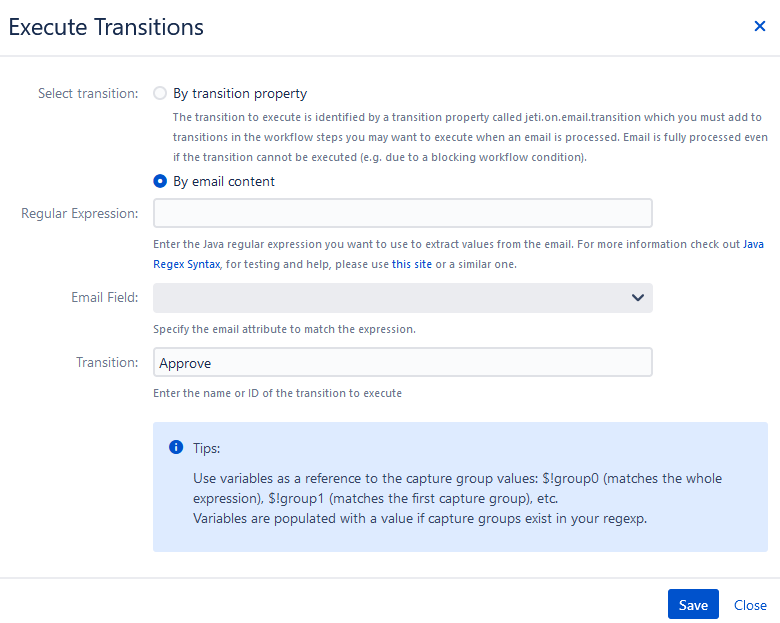
In this case, the transition that is named will be picked for execution.
| Note |
|---|
Workflow Conditions or Workflow Validators may block the transition from being executed but this does not affect the processing of the email. |
...
This action sends an auto-reply email back to the email sender using a selected email template. The action may be configured via a popup dialog:
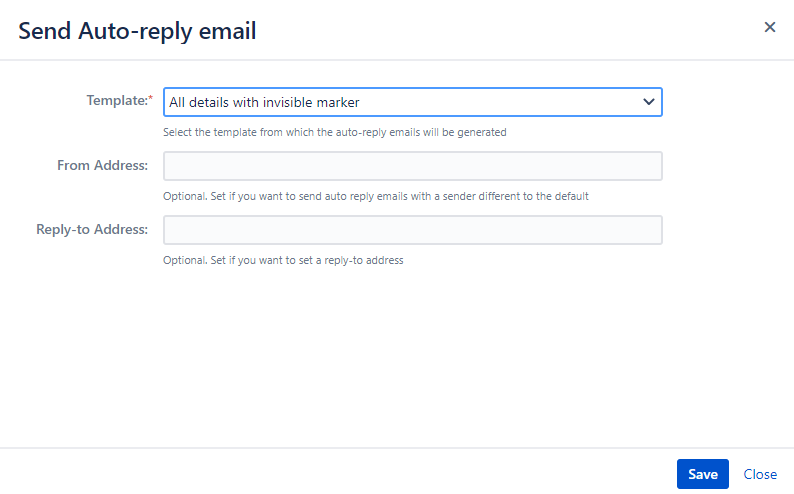
...
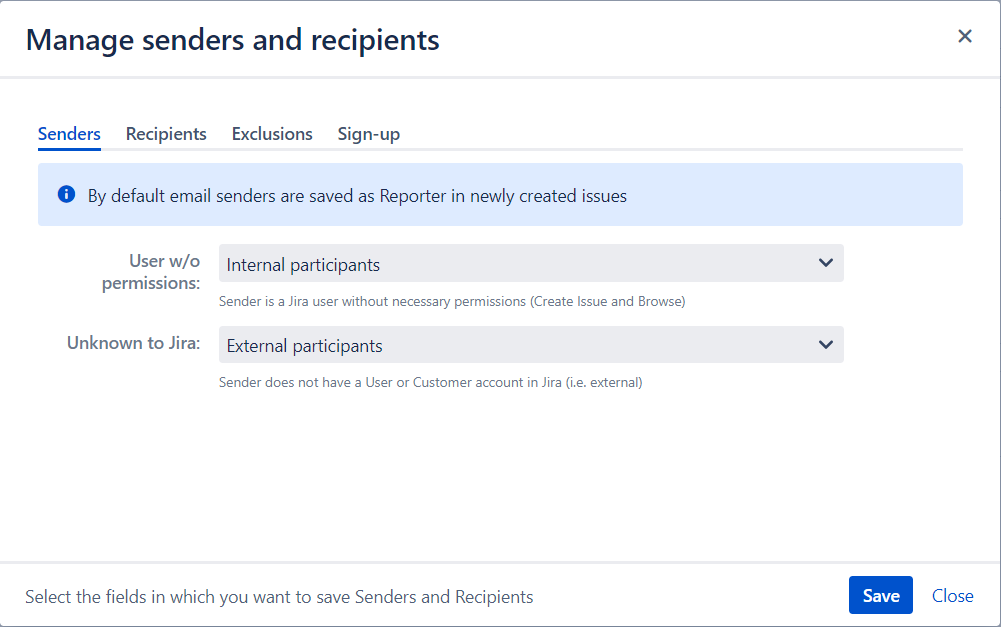
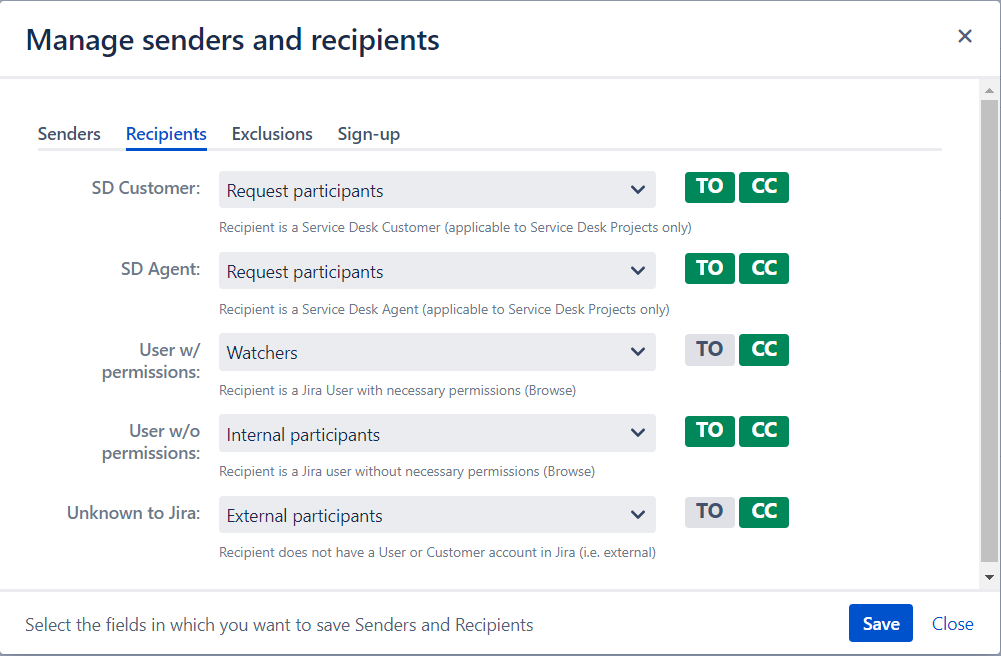
This action saves email senders and recipients into issue fields. The action may be configured via the below popup dialog:
...
Select the issue field to which the sender will be saved if s/he does not have permission to create or access the issue in Jira.
User picker or text fields are available.
...
If a recipient email address is recognized as a SD Customer (and the issue is a SD Request), then the customer account will be saved to the selected user picker field. (Default is Request Participants).
...
If the recipient is unknown to Jira (neither a user account nor a customer account exists for the email address), the email address may be saved to a text field. Email addresses saved here may be set as recipients in notifications or manual emails
...
| Status | ||||
|---|---|---|---|---|
|
...
| Status | ||||
|---|---|---|---|---|
|
...
Email Address Exclusions
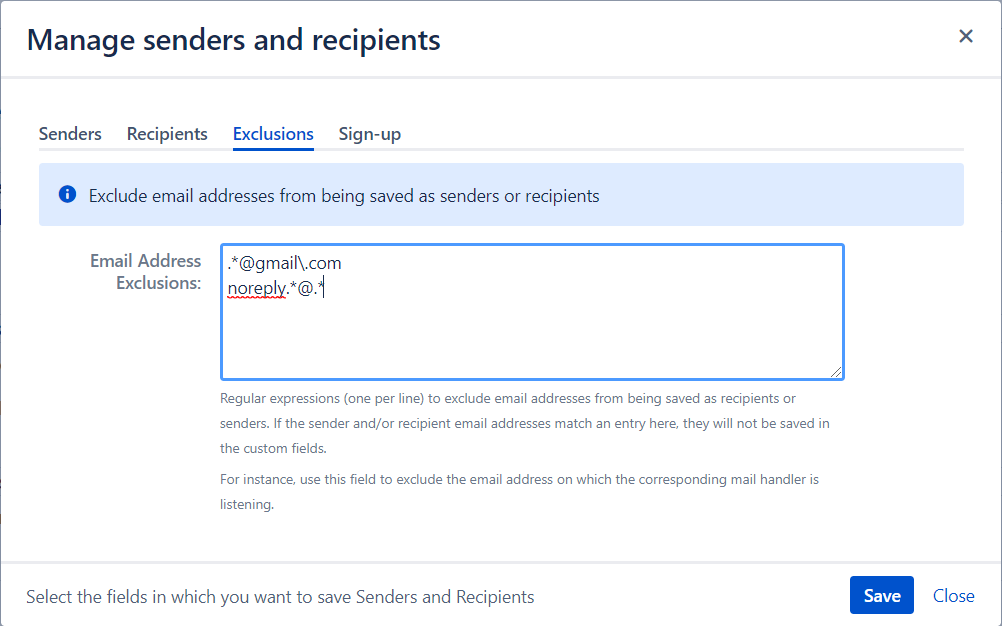
Under the Exclusions tab, regular expressions may be defined. If the email's sender address or recipient addresses match any of these regexes, they are discarded and not saved to issue fields.
This is useful to filter out senders and recipients not matching a certain domain or to prevent saving the mail box email address to issue fields.
Sign-up settings
| Status | ||||
|---|---|---|---|---|
|
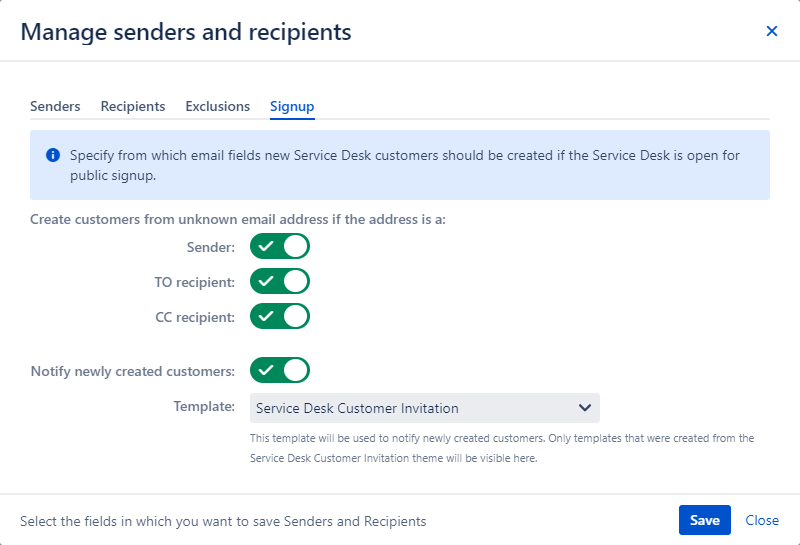
In case of Jira Service Management and if the Service Desk is Open for signup, you can define from which email fields you would like to create a new customer.
If you turn off the creation of new customers, then the Mail handler treats the email address as "Unknown to Jira".
You can also send a signup notification to your new customers, with the Notify newly created customers option. After enabling it you can select a template that will be used to generate the signup notification emails. Note that you can only choose templates here that were created from the Service Desk Customer Invitation theme. In the template, you can use the $!customer.displayName field to refer to the name of the newly created customer (the names of newly created customers are their email addresses).
...
The action sets issue fields from email content. The action may be configured via the below popup dialogs:
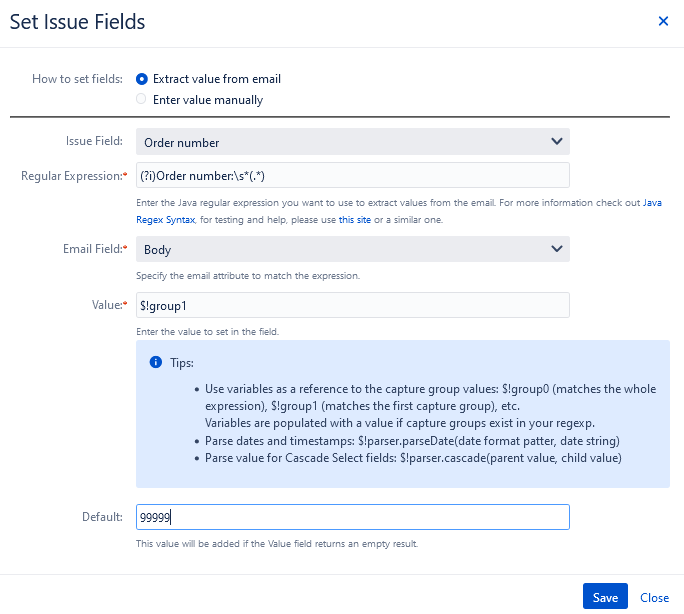
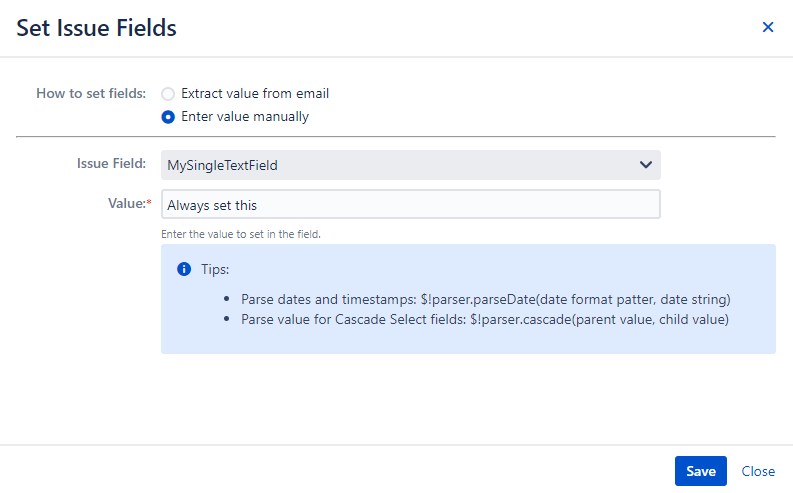
The How to set fields option is a method selector:
...
Manually entered value (e.g. name of a Priority) or reference to the capture groups of the regex. As shown in the example, it follows Velocity Markup syntax therefore it is possible to use #if or other Velocity statements, value transformations.
...
Input helping table for system fields
...
username
user key
email address
Full name (if only one user exist with this name)
...
admin
JIRAUSER10000
admin@my-company.com
John Smith
...
Input helping table for custom fields
...
Text fields truncate
There is a limitation in Jira for the length of the text fields. Before the Set Field action adds value for text fields, it truncate the text to this maximum length.
The default maximum length of the text fields is 32767 characters.
How to initialize Date and DateTime picker fields
If you want to set Date or DateTime picker fields, date or date-time values from the email must be parsed. Email This Issue provides an object that supports date parsing.
For example:
regexp returns the date string in the first capture group: 23/07/2015. Then set the Value to $parser.parseDate("dd/MM/yyyy", $group1).
The date or date-time pattern follows the syntax in Java SimpleDateFormat.
There is a possibility to set the current timestamp as the target value of any Date or DateTime picker field. To do this, set Value to $parser.now().
Note: the latter feature is also available for text (single line) field assignments. Moreover, in this case the user can specify any valid date/time pattern, how the text shall be written into the field, e.g. by using $parser.now("dd/MM/yyyy"). On the other hand, Date and DateTime picker fields accept data only in a specific format, therefore you do not need to specify any pattern for them. If you still do it, the expression will be automatically overwritten to the parameter-free variant of the parser.
Initialize multi-select fields
In order to save values in multi-select custom fields, the value must be a comma-separated list of literals. Each literal must match a valid option in the field.
e.g. your regex returns the values in groups 1, 2 and 3. Then set the value to $group1, $group2, $group3
Initialize cascading select fields
It is possible to save values in Cascading Select fields.
If you want to initialize the parent value of a cascading select field, configure the rule with a manual value or with a value from a capture group.
If you want to initialize both the parent and child values, use a special syntax in the Value field: $parser.cascade("<parent-value>", <child-value>").
For example:
- $parser.cascade($group1, $group2) or
- $parser.cascade("some value for parent", "some value for child")
Increment or Decrement number fields
If Value is set to a number prefixed with a + or -, and the Issue Field selects a number custom field, the current value of the field will be incremented or decremented respectively, otherwise, the field is set to the value.
E.g if Value is "+2" the field value is incremented by 2.
Mandatory field support
If you have mandatory fields on your create issue screen or on your service management portal, the create issue action shows it on the Mail handler configuration screen:

...

...

...

...
Conditions allow for conditional processing of emails. This is useful when fields must be set differently depending on some conditions. Conditions may be configured via the below popup dialog:

Condition actions provide conditions:
- on the sender
- on the issue
- on the email content
| Note |
|---|
It is not necessary to specify all types of conditions in a Condition action. It is perfectly valid to have any number of combinations. If multiple condition types are provided, they are AND-ed. A simple JQL condition looks something like this:
|
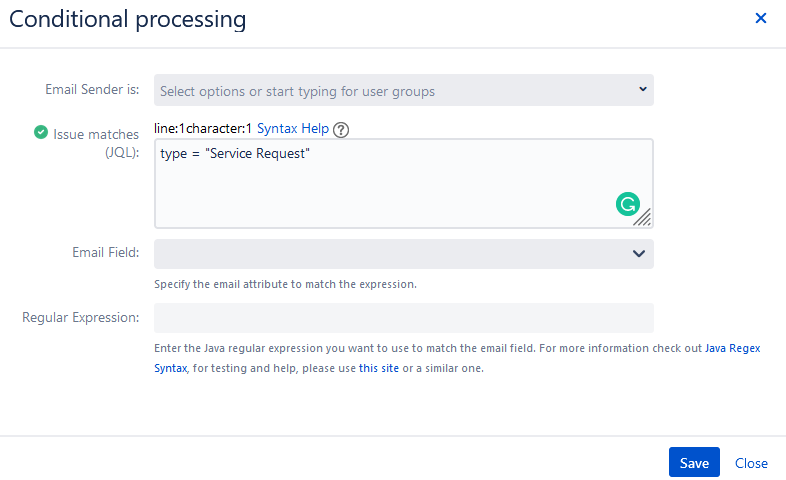
...
This is a multi-select dropdown to set conditions on the sender. Options include:
- External: it means email sender is unknown to Jira
- Service Management Customer: the sender is a SD customer and the issue is a SD Request
- Service Management Agent: the sender is a SD Agent in the SD Project
- User with Permissions (Browse): Sender is a user with Browse permissions to view the issue
- User without Permissions: Sender is a user without Browse permissions
- Disabled User: Sender is an inactive user
Since version 8.1.1 it is possible to select Jira User groups as well. Just start typing the name of the groups you want to add and select from the matching groups.
...
Available Child Actions
Conditions typically have child actions that can be added via the eclipse menu:

Child actions include all the above-mentioned action types, plus two additional ones:
- Condition
- Else
Nest Conditions
It is possible to add a condition action within another condition action, therefore nesting conditions into each other:
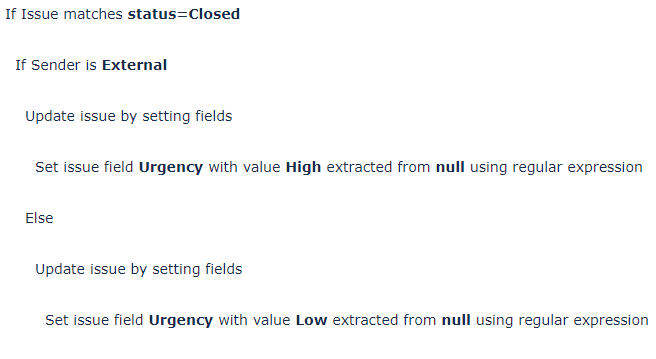
Else
"If" condition may include an "Else" part, which is executed if the condition is not met. You can add this by selecting Else from the condition's eclipse menu.
Else actions may also have their own child actions and conditions, these may be added via the eclipse menu:

Create a New Issue and Link it to the Existing Issue
| Status | ||||
|---|---|---|---|---|
|
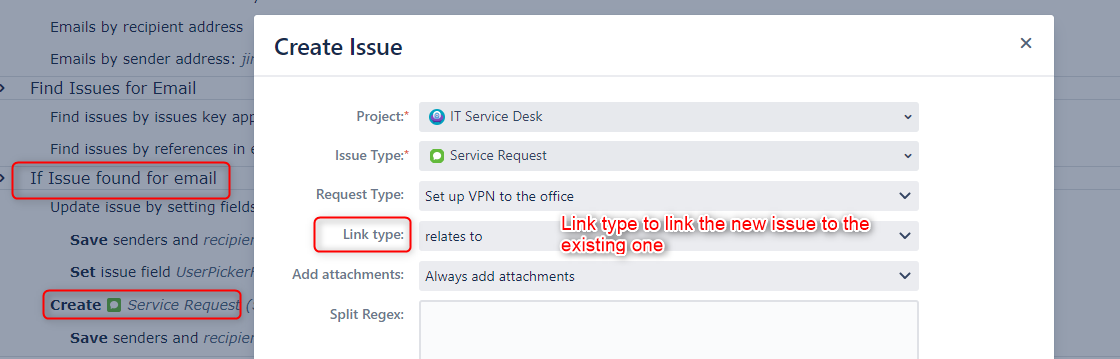
The Create Issue action creates a new issue. If added to the section "If Issue found for email", it will create a new issue instead of commenting the existing one. The two issues may be linked using the link type attribute, but this is optional.
This feature is useful e.g. if your processes do not allow commenting on closed issues. In this case, simply add a Condition that checks if the issue which was found for the email is closed, resolved etc. If so, create a new issue, otherwise comment the existing one
Create New Issues
The "Issue not found for email" section of the mail handler is composed of actions that are executed if the handler could not associate an existing issue with the email that is being processed. Unlike the Filter Emails and Find Issues sections, which include actions of the same kind, this section has a variety of different actions.
Actions may be added by clicking the + icon of the section.
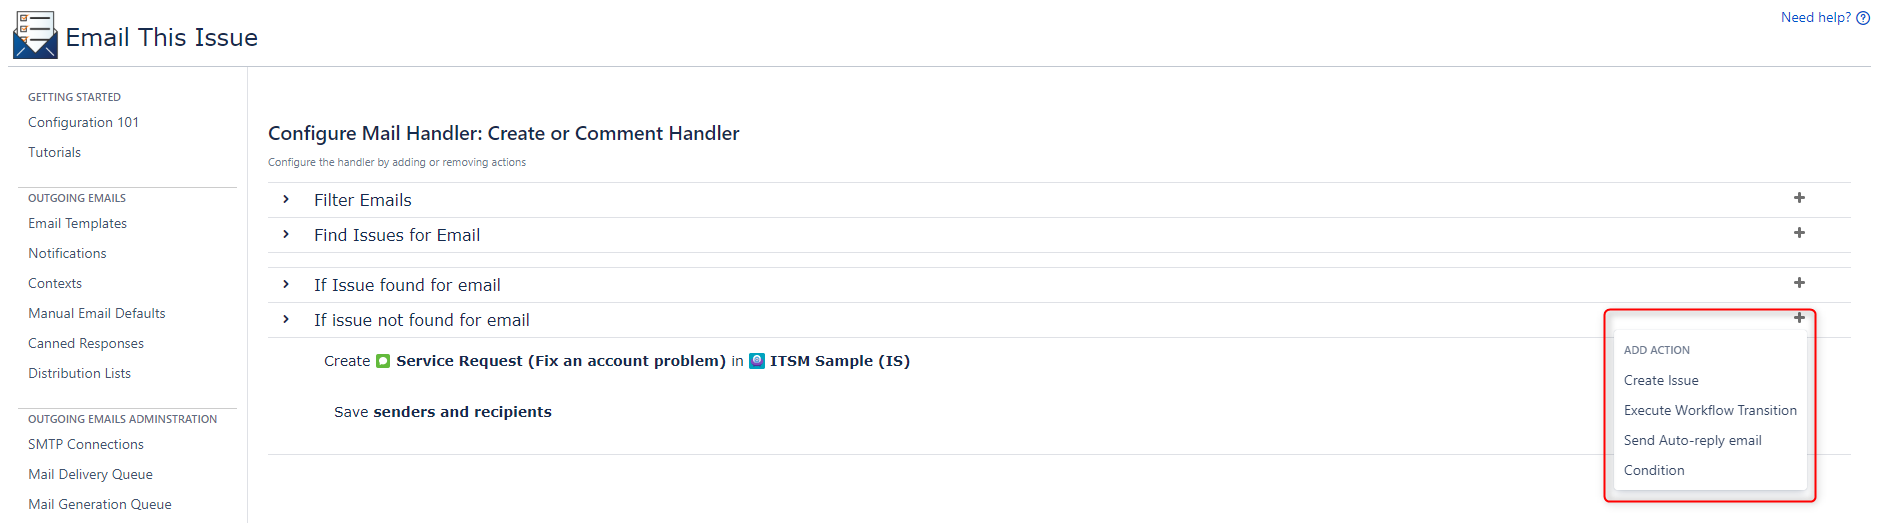
Summary of actions to be used here is as follows:
...
Executes a workflow transition in the issue's current status.
See documentation above.
...
Sends an auto-reply email using a selected template
See documentation above.
...
Saves email senders and recipients to issue fields. This action may be added as a child action of the Create Issue Action
See documentation above.
...
Sets an arbitrary issue field. This action may be added as a child action of the Create Issue Action.
See documentation above.
...
Provides conditional processing.
See documentation above.
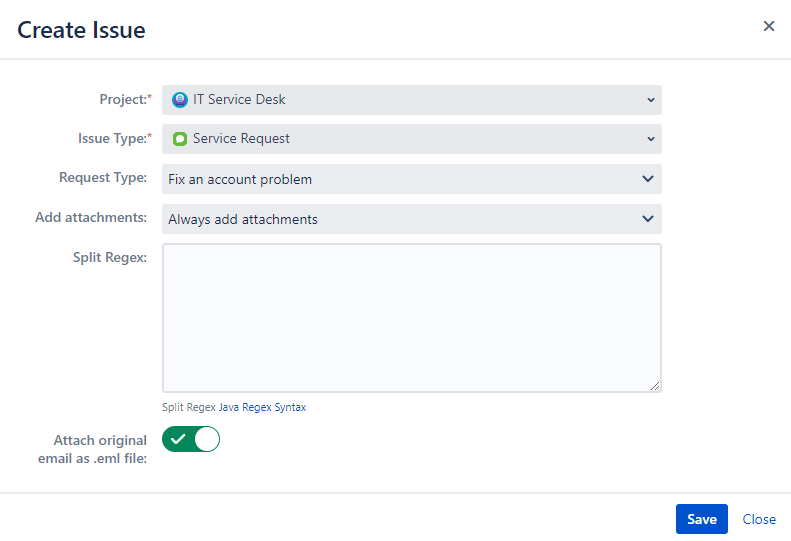
Create Issue Action
This action creates a Service Management request or Jira Issue from the email content. The action may be configured via the popup dialog below:
...
Defines how the action handles attachments in the email. Options include:
- Add Attachments
- Do not Add Attachments
- Do not add attachment if one with the same name exists
- Do not add attachment if one with the same name and size exists
- Filter attachments using the Attachment Filters
...
Create Service Management Requests
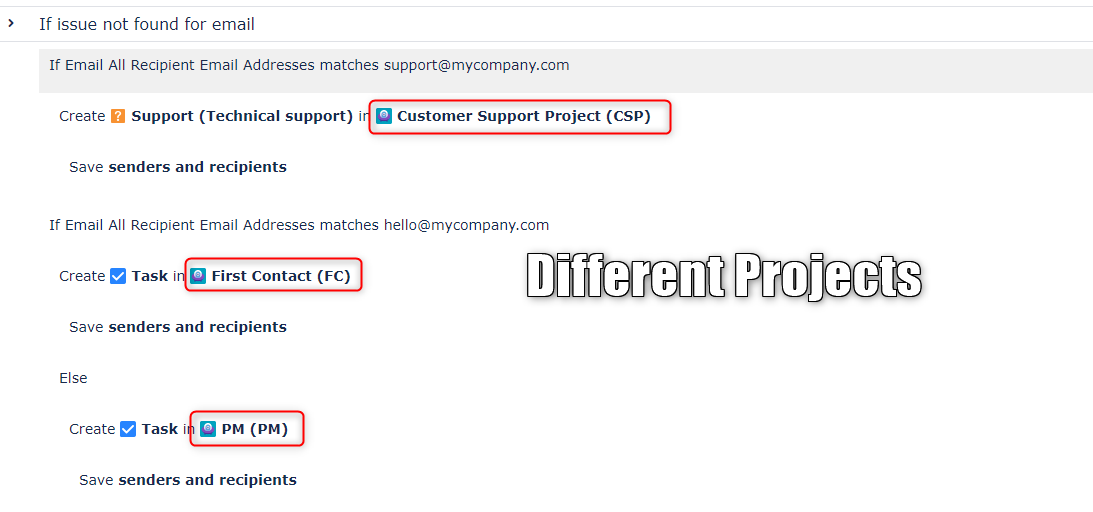
Route Emails to Multiple Projects
By using conditions, you can route incoming emails to multiple projects depending on the email content. Below is an example that creates issues in different projects depending on the recipient address via which the email was received.
...
| title | On this page |
|---|
...